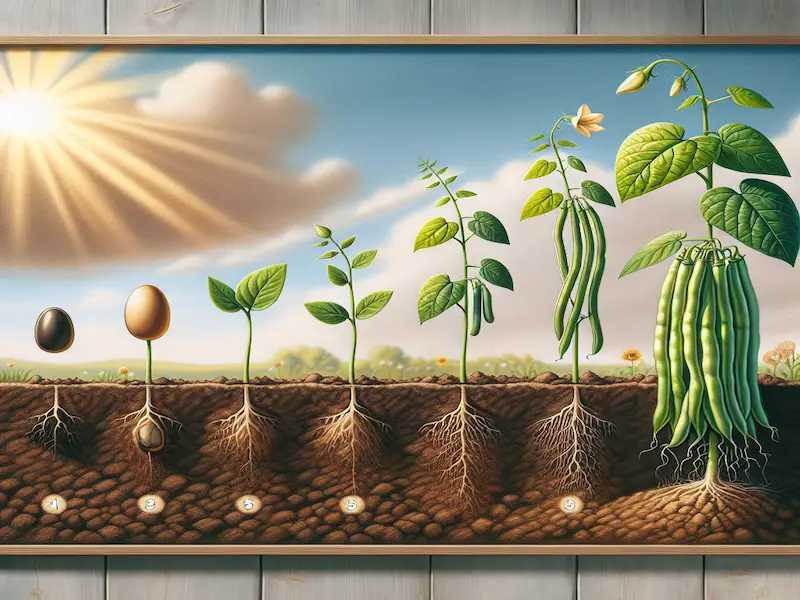
Life Cycle of Green Beans Plant: From Seed to Harvest
Published: 3 Feb 2024
In this blog post, I want to share my personal experience with Green Beans Growing Stages. From selecting the perfect variety to harvesting the beans at their peak freshness, I’ll take you through each growing stage of green beans. I hope you’ll find my insights helpful and inspiring.
Green beans have become one of the favourites because they are not only easy to grow but also incredibly versatile in the kitchen.
I’ll explore the techniques for selecting a suitable variety, preparing the soil for maximum growth, and nurturing the plants through each stage of development. By the end of this blog post, you’ll be armed with the knowledge and confidence to grow your vegetable successfully.
2. Choosing the suitable variety for your garden
When you want to grow in your garden, choosing the appropriate variety is most necessary. There are so many options available, but it is upon you to decide which one is best. In this section, I will share my insights and tips on selecting the perfect green bean variety to suit your gardening needs.
Factors to Consider
Before diving into the different varieties, there are a few factors you should consider:
- Think about the available space in your garden. Some varieties are more compact and bushy, making them ideal for smaller gardens or containers. Others are vining varieties that require trellises or supports.
- Consider your climate. Certain varieties thrive in hot weather, while others prefer cooler temperatures.
- Think about your personal preferences.
Do you prefer stringless beans or those with a traditional snap? This will help narrow down your options.
Popular Green Beans Varieties
Now, let’s explore some popular varieties that you can consider for your garden. One common variety is the “Blue Lake.” These beans are known for their delicious flavor and tender texture. They are a classic choice for canning and freezing due to their uniform size and shape. Another popular variety is the “Kentucky Wonder.” These beans are known for their vigorous growth and abundant production. They have a rich, earthy flavor and are perfect for fresh eating.
Specialty Green Beans Varieties
If you’re looking to try something unique and different, there are also specialty varieties available. For example, the “Dragon Tongue” variety features stunning purple and green striped pods. These beans are tender and sweet, making them a delightful addition to any dish. Another specialty variety is the “French Filet.” These slender, delicate beans are harvested when young and tender, offering a mild flavor and crisp texture. They are perfect for steaming or stir-frying.
Choosing the suitable variety for your garden can make all the difference in the success of your crop. You can narrow down your options by considering factors such as space, climate, and personal preferences, Whether you opt for traditional varieties like “Blue Lake” and “Kentucky Wonder” or explore unique options like “Dragon Tongue” and “French Filet,” you’re sure to enjoy a bountiful and delicious harvest.
3. Preparing the soil and planting green beans seeds
In this section, I will guide you through preparing the soil and planting green bean seeds. For a successful harvest, it’s necessary to prepare the soil properly and plant the seeds with care. Here are some critical steps to follow:

- Start by choosing a sunny location for your vegetable patch. These plants grow in full sunlight, so look for a point in your garden that gets at least 5 to 8 hours of direct sunlight each day.
- Next, clear the area of any weeds or debris. You want to give your green bean plants the best chance of success, so remove any competing plants and ensure that the soil is clean and clear.
- Once the area is clear, it’s time to prepare the soil. Green beans prefer well-draining soil with a pH level between 6.1 and 7.1. Make use of a soil testing kit to find out the pH of your soil, and, if necessary, adjust it using organic soil amendments.
- Before planting the seeds, adding organic stuff to the soil is a brilliant idea. This could be in the form of compost or well-rotted manure. Spread a layer of organic matter over the soil and work it in using a garden fork or tiller.
- Finally, it’s time to plant the green bean seeds. Dig small holes, about 1 to 2 inches deep, and space them 2 to 4 inches apart. Place a seed in each hole and cover it with soil. Water the newly planted seeds gently but thoroughly, and till the seeds sprout, keep the soil damp.
By following these steps, you’ll give your green bean a strong start and set yourself up for a successful harvest.
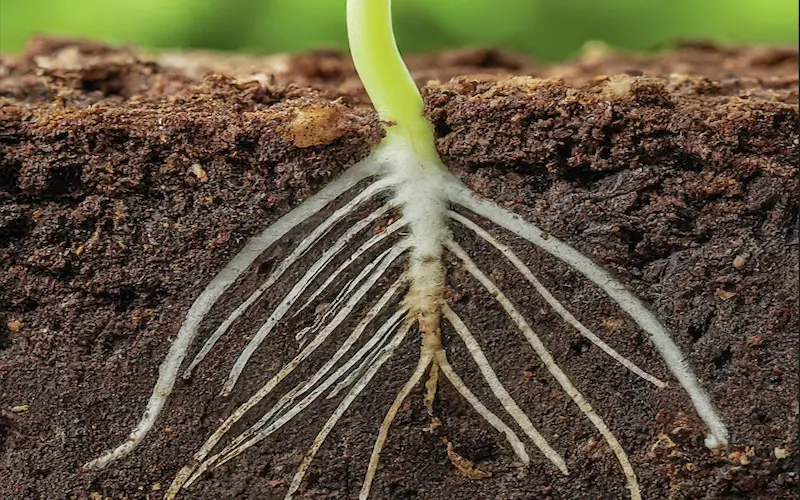
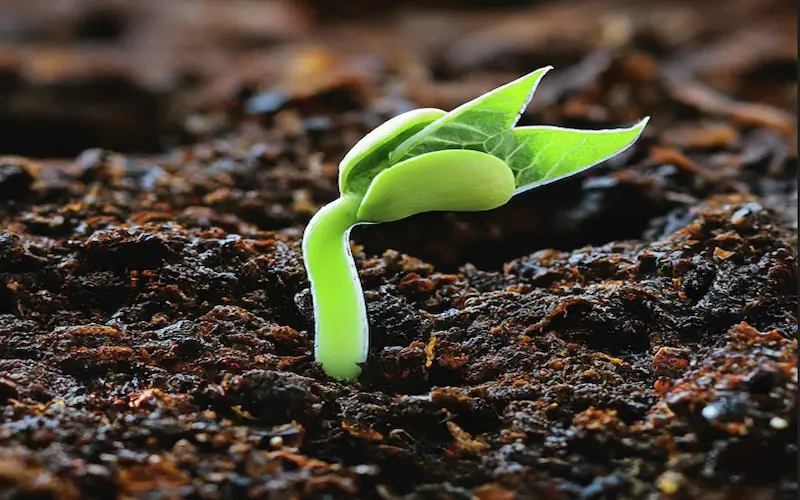
4. Germination and early growth of green beans plants
In this section, I’ll discuss the germination and early growth of vegetable. Germination and early growth are crucial stages in the life cycle of green bean plants. As an avid gardener, I have had my fair share of experiences with these stages, and I am excited to share my knowledge with you.
- Planting the seeds: Once you have prepared the soil, it’s time to sow the seeds. Make sure to plant them about 1-2 inches deep and space them 3-4 inches apart. If you’re planting in rows, leave around 18-24 inches between each row. Remember to water the soil gently after planting to provide the seeds with the moisture they need to germinate.
Germination process:
After a week, you’ll start to see the first signs of germination. Tiny green bean seedlings will emerge from the soil, reaching for the sunlight. During this stage, the plants are highly vulnerable, so it’s essential to protect them from harsh weather conditions and pests. Consider using row covers or light mulch to shield the seedlings.
- Providing proper care: As the green bean plants continue to grow, they will need good care to thrive. Ensure they receive at least 5-7 hours of direct sunlight per day and water them regularly. Overwatering is the cause of root rot, so avoid it. Additionally, consider using a trellis or stakes to support the plants as they grow taller. This will prevent them from sprawling on the ground and reduce the risk of disease.
- Monitoring growth: Keep a close eye on the growth of your green bean. They should start developing true leaves, which are larger and more distinctive than the initial seedling leaves. At this stage, it’s essential to watch out for any signs of pests or diseases. Aphids, spider mites, and fungal infections can hinder the growth of your plants. If you notice any issues, take appropriate measures, such as using organic insecticides or removing infected leaves.
By following these steps and monitoring the germination and early growth of your green bean plants, you’ll set a solid foundation for a successful harvest
5. Nurturing and caring during green bean growing stages
In this section, I’ll share some tips on nurturing and caring throughout the growing stages.
During the growing season, it is essential to care for bountiful harvest. One of the most important aspects of caring for green bean plants is regularly watering. Green beans require regular moisture, so water them one or two times a week, depending on the weather conditions. Overwatering causes root rot and other diseases, so avoid it. Another crucial element of nurturing green bean plants is providing support. As the plants grow, they will need something to climb on, such as a trellis, stakes, or a fence. Supporting the plants not only helps prevent them from sprawling on the ground but also allows for better air circulation, reducing the risk of fungal diseases.

In addition to watering and support, regular weeding is essential to ensure the health and productivity of green bean plants. Weeds compete with the plants for nutrients and water, so it’s crucial to keep the area around the plants clear. Use a hoe or hand to pull the weeds, being careful not to disturb the beans’ shallow roots. Applying mulch around the base of the plants can also help suppress weeds and retain moisture in the soil. Mulch can be organic materials such as straw, grass clippings, or shredded leaves.
Pest and disease control is another vital aspect of caring for green bean plants. Inspect the plants regularly for common pests like aphids, bean-leaf beetles, and spider mites. If you notice any signs of pest infestation, such as holes in the leaves or distorted growth, take action immediately. There are various organic methods to control pests, such as spraying a mixture of water and insecticidal soap or using beneficial insects like ladybugs. Additionally, fungal diseases like powdery mildew can affect green bean plants. To prevent these diseases, provide adequate spacing between plants for good air circulation and avoid watering the foliage. If necessary, apply organic fungicides as a preventive measure.
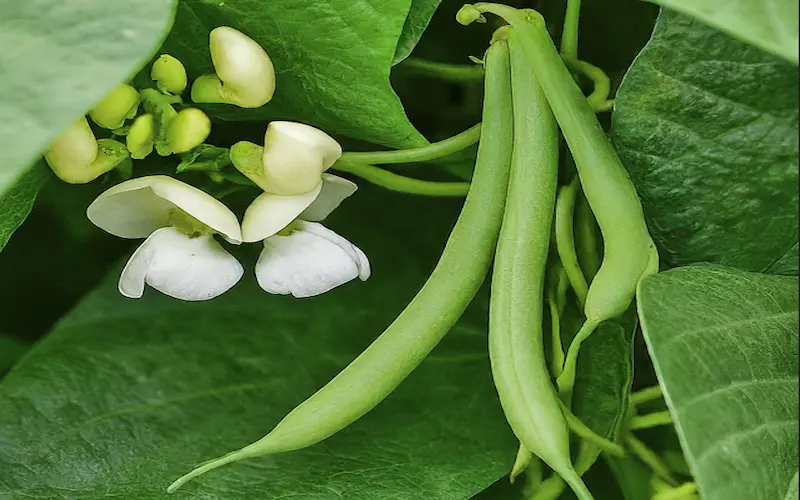
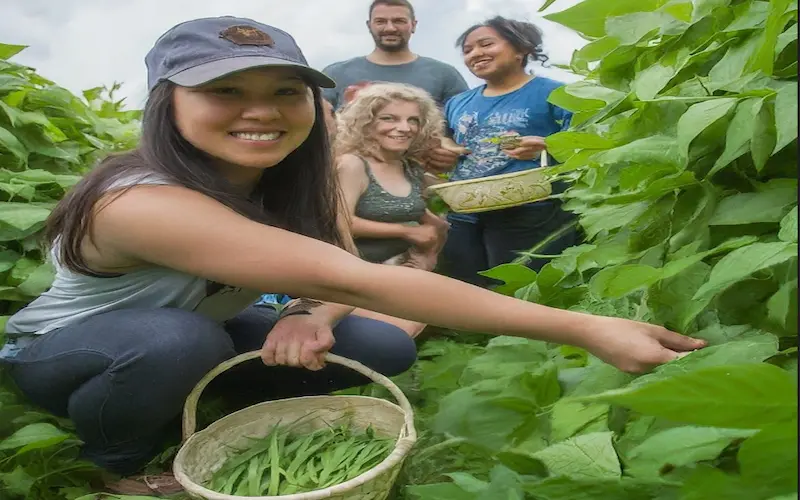
Lastly, regular harvesting is crucial. Harvest them when they are firm and crisp. Take your time, as overripe beans can be tricky and stringy. Gently snap or cut the beans off the plants, being careful not to damage the stems or other pods. Regular harvesting not only ensures the best flavor and texture but also encourages the plants to produce more beans. Enjoy the fruits of your labor by incorporating fresh green beans into your favorite recipes or preserving them for later use. With proper nurturing and care, your green bean plants will provide you with a delicious and rewarding harvest.
6. Harvesting beans at their peak freshness
Knowing when to harvest
Harvesting beans at the right time is very important to ensure maximum flavor and freshness. A common mistake many gardeners make is waiting too long to pick their beans. To determine if your beans are ready for harvest, look for telltale signs. Mature beans are firm but not hard, and they should snap easily when bent. Avoid overly ripe harvesting beans, as they tend to be tough and stringy. Regularly check your plants for fully developed pods to ensure you don’t miss the optimal harvesting window.
Harvesting techniques
When it comes to harvesting green beans, there are two primary methods: handpicking or using a pair of scissors. Handpicking is the more traditional approach and allows you to select each bean carefully. Gently hold the stem near the base of the pod and pull upward with a gentle twisting motion. If the beans are resistant, they may not be ready for harvest. Alternatively, you can use a pair of scissors to snip off the pods. This method is beneficial if you have a large number of beans to harvest, as it is quicker and less labour-intensive.
Harvesting frequency
Green beans are known for their ability to produce a maximum quantity throughout the growing season. To ensure a continuous supply of fresh beans, it’s necessary to harvest them regularly. Aim to pick your beans every two to three days, as this encourages new pods to develop. If left on the plant for too long, the beans will become tough and may even reach a stage where they are no longer suitable for consumption. By maintaining a consistent harvesting schedule, you’ll enjoy a steady supply of tender and flavourful green beans.
Storage and preservation
To preserve the freshness and flavor of your harvested beans, it’s essential to handle them with care. After picking, gently wash the beans in cool water to finish any dirt or debris. Pat them dry with a cloth or towel before storing them. Green beans are best stored in a hole plastic bag or airproof container to maintain their crispness. They can be refrigerated for up to a week, but for long-term storage, consider blanching and freezing them. Blanching involves briefly boiling the beans and then placing them in ice water to halt the cooking process. Once cooled, pack them into freezer-safe containers or bags, and they can be stored for up to a year.
Enjoying the fruits of your labor
After all the hard work and anticipation, it’s finally time to savor the delicious taste of your home-grown green beans. There are countless ways to enjoy them, whether it’s a simple steaming or stir-frying, adding them to salads, soups, or stews, or even pickling them for a tangy twist. Explore different recipes and cooking methods to appreciate the versatility of green beans fully. Remember to share your harvest with friends and family, as nothing beats the satisfaction of sharing the fruits of your labor with loved ones. So get creative in the kitchen and enjoy the incredible flavors that your home-grown green beans have to offer!
7. Tips for preserving and enjoying your home-grown beans
In conclusion, growing green beans can be a rewarding and enjoyable experience. From choosing the suitable variety to harvesting at their peak freshness, every step of the process is crucial for a successful harvest. By following the tips and techniques shared in this blog post, you can ensure that your green bean plants thrive and produce an abundance of delicious beans.
But the journey doesn’t end with the harvest. To make the most of your home-grown green beans, it’s essential to know how to preserve and enjoy them properly. Here are some tips to help you do just that:
- Freezing: Green beans can be easily preserved by blanching them in boiling water for a few minutes, then placing them in ice water to cool. Once they are cool, drain them and pack them into freezer-safe containers or bags. Make sure to label and date them for easy reference. Frozen green beans can be used in soups, stir-fries, and casseroles throughout the year.
- Canning: If you’re a fan of canning, beans can be safely preserved using a pressure canner. Follow the instructions for your specific canner and make sure to use the correct processing time and pressure. Canned green beans make a convenient and tasty addition to your pantry.
Pickling:
- For a tangy twist, consider pickling your green beans.
- Prepare a brine of vinegar, water, salt, and spices, and heat it until it comes to a boil.
- Pack your beans into sterilized jars and pour the hot brine over them, making sure to leave some headspace.
- Seal the jars and process them in a boiling water bath for the recommended time.
- Pickled green beans make a delicious addition to salads, sandwiches, and appetizer platters.

- Fresh enjoyment: Of course, there’s nothing quite like enjoying your home-grown green beans fresh from the garden. Whether steamed, sautéed, or added to salads, beans offer a crisp and vibrant flavor that can’t be beaten. Experiment with different recipes and cooking methods to find your favorite way to savor this seasonal delight.
As your green bean grows, remember to enjoy the process and take pride in your home-grown harvest. With a bit of care and attention, you can experience the joy of cultivating your own delicious green beans year after year.


- Be Respectful
- Stay Relevant
- Stay Positive
- True Feedback
- Encourage Discussion
- Avoid Spamming
- No Fake News
- Don't Copy-Paste
- No Personal Attacks
- Be Respectful
- Stay Relevant
- Stay Positive
- True Feedback
- Encourage Discussion
- Avoid Spamming
- No Fake News
- Don't Copy-Paste
- No Personal Attacks
