How to Grow Black Beans: A Step-by-Step Guide
Published: 4 Mar 2025
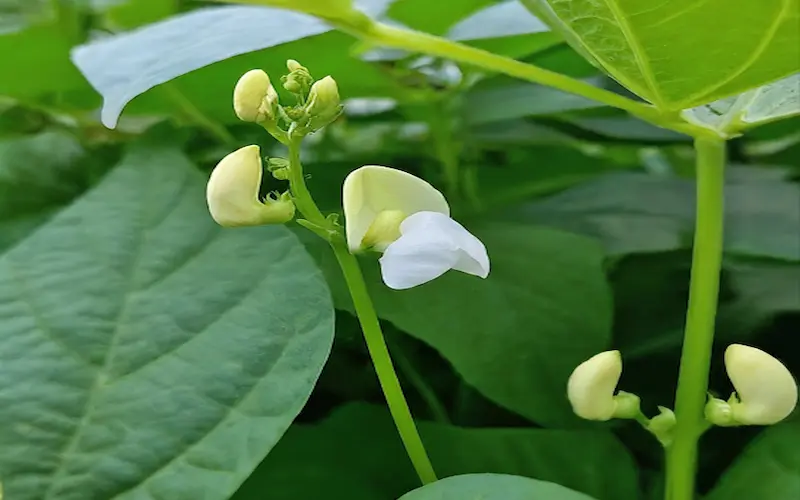
The scientific name of black beans is Phaseolus vulgaris. They have been a staple in many cultures due to their rich flavor and nutritional benefits. They are a type of legume that is often paired with other vegetables in recipes. The black bean bush can grow up to 8 feet tall and produces purple or black flowers. Some common companion vegetables for black beans include corn, tomatoes, peppers, onions, garlic, and cilantro.
In this article, I will guide you through the process of growing black beans, from the basics to the satisfaction of harvesting your crop.
What are black beans?
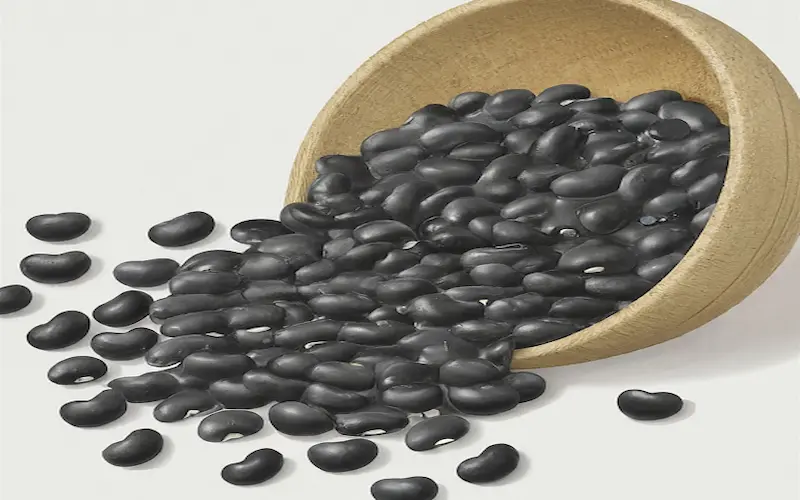
Black beans, also known as turtle beans, are a variety of common beans particularly revered in Latin American, Cajun, and Creole cuisines. They are small, glossy, and, as the name suggests, boast a deep black hue.
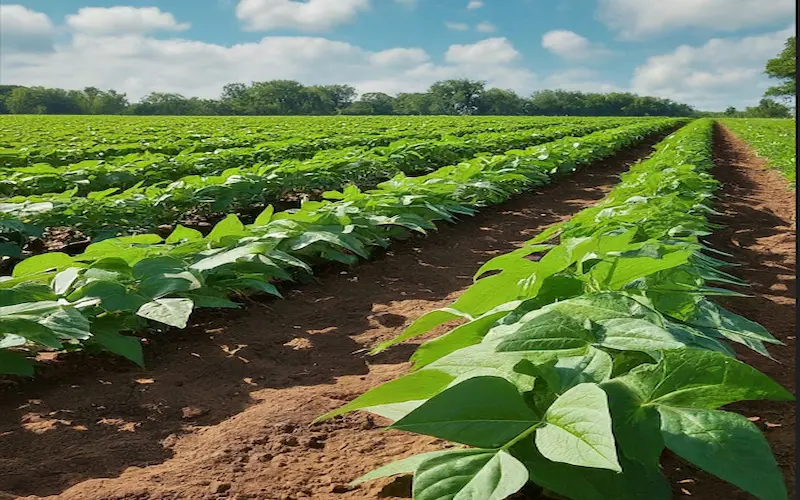
These beans are a type of pulse and are celebrated for their dense, meaty texture, which holds up well in various dishes, from soups and stews to salads and burritos. As a plant, the black bean grows on a bush-like structure ranging from two to three feet in height, making it suitable for various garden sizes.
Understanding the nature of the black bean plant is crucial for any grower. Recognizing their growth patterns, nutritional needs, and lifecycle will significantly enhance your ability to nurture them from seed to harvest.
Benefits of growing black beans
| Benefits of growing black beans |
|---|
There are numerous advantages to black beans growing in your garden.
|
When to grow black beans
Timing is everything in agriculture, and growing black beans is no exception. Ideally, it would help if you planted your black bean seeds after the last frost of the spring has passed. This is because black beans thrive in warm temperatures and are not frost-tolerant.
The best time to plant black beans is when the soil has warmed to at least 60°F (15°C), typically several weeks after the last frost date. This ensures the soil is warm enough for the seeds to germinate effectively. In most temperate climates, this window falls between late spring and early summer.
It’s also important to consider the length of your growing season. Depending on the variety, black beans usually require between 80 and 120 days to reach maturity. Ensure you have a long enough period of frost-free weather to accommodate this growth cycle before the first frost of the coming fall or winter.
How to Grow Black Beans
Black beans are a popular legume that can be grown quickly in your garden. They require well-drained soil rich in organic matter and full sun or partial shade. Plant the beans about 6 inches deep and 2-3 feet apart. Water the beans consistently, and keep the soil moist but not waterlogged.
Black beans can be grown from seeds directly in the ground or started indoors and then transplanted outside. At maturity, the pods will contain black beans, which can be harvested when fully ripe.
Climate and soil requirements
Choosing the suitable climate
Black beans flourish in a warm climate with plenty of sunlight. They require at least six to eight hours of sunlight daily to thrive. Consistent warmth is critical, as cold temperatures can severely impede growth and kill the plant.
If you live in a region with a shorter growing season, you may need to start your seeds indoors or use a greenhouse to extend the growing period.
Soil requirements
The soil where you plant your black beans should be well-draining and fertile. Black beans prefer a slightly acidic to neutral pH (around 6.0 to 7.0), although they are relatively adaptable to various soil conditions.
Before planting, you should test your soil and amend it with compost or other organic matter to improve fertility and drainage. Good soil structure is also essential for root development. Loamy, not compacted, soil allows roots to spread out quickly, which helps the plant access nutrients and water more efficiently.
A well-prepared soil bed can make a significant difference in the success of your black bean crop.
Choosing the suitable variety
Several varieties of black beans are available to the home gardener, each with its characteristics. Some popular varieties include ‘Black Turtle,’ known for its hardiness and traditional flavor, and ‘Midnight Black Turtle Soup,’ celebrated for its slightly smaller size and quicker cooking time.
When selecting a variety, consider your climate and the length of your growing season. Some varieties mature faster than others, which can be beneficial if you have a shorter warm weather window. Additionally, certain varieties may be more resistant to pests and prevalent diseases in your area.
Doing some research before purchasing your seeds can pay off immensely. Look for varieties well-suited to your local conditions. Have you received positive reviews from other gardeners? This will increase the likelihood of a bountiful harvest.
Soil Preparation
Preparing the soil for your black beans is a critical step in planting. Start by choosing a sunny spot in your garden with adequate drainage. Clear the area of weeds, rocks, and debris, which can inhibit growth and encourage pests.
Next, use a spade or tiller to work the soil to a depth of about 8-10 inches. This loosens the soil, allowing roots to penetrate more easily. If your soil is heavy or clay-like, consider adding sand or organic matter to improve its structure.
Finally, enrich the soil with compost or a balanced organic fertilizer. This will provide the nutrients for the black beans to grow strong and healthy. Allow the soil to settle for a few days before planting your seeds to ensure the nutrients are well-integrated.
Planting Black Beans – a step-by-step guide
Preparing your seeds
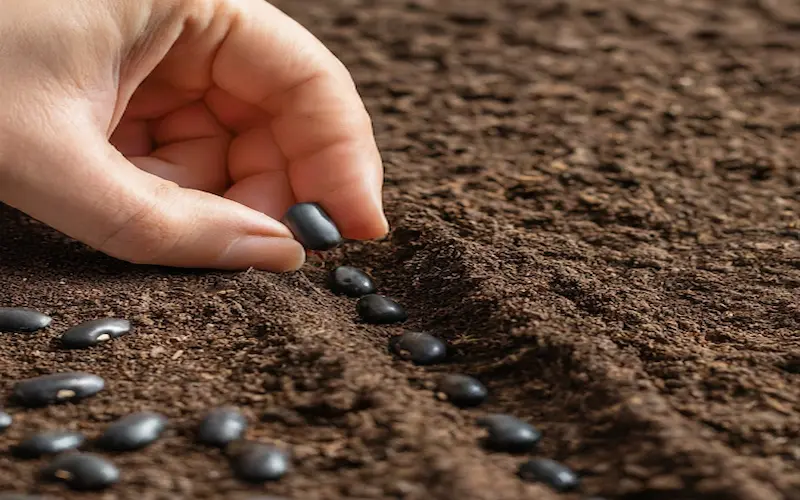
Before planting, you must ensure your black bean seeds are in good condition. Inspect the seeds and select the healthiest-looking ones. Some gardeners recommend soaking the seeds for 1-2 hours before planting to speed up germination, but this step is optional.
Sowing the seeds
When the soil is ready, it’s time to sow your black bean seeds. Plant the seeds about 1-1.5 inches deep into the soil, spacing them approximately 4-6 inches apart. If you’re planting multiple rows, space the rows about 18-24 inches apart to give the plants room to grow and allow easy access during maintenance.
Watering after planting
After planting, water the soil gently but thoroughly to settle the seeds into place. Keep the soil moist but not waterlogged, which can cause the seeds to rot. With proper care, you should see sprouts within 8-10 days.
Caring
After your black beans have sprouted, it’s crucial to maintain a consistent care routine to ensure a healthy growth cycle. Regular watering is essential, especially during dry spells. However, avoid overwatering, as black beans are susceptible to root rot.
If you sowed the seeds densely, you may need to thin the plants to the recommended spacing as they grow. This allows each plant enough space to mature properly. Additionally, mulching around the plants can help retain soil moisture and suppress weeds.
Fertilizing your black beans is generally unnecessary if you adequately amend the soil before planting. However, the light application of a balanced fertilizer can be beneficial during the flowering stage and promote healthy pod development.
Common pests and diseases
Black bean plants can fall prey to a variety of pests and diseases. Common pests include aphids, spider mites, and bean beetles. To combat these, practice regular inspection of your plants and employ organic pest control methods, such as introducing beneficial insects or using insecticidal soap when necessary.
Diseases such as bean blight, rust, and fusarium wilt can also affect black beans. These diseases often stem from too much moisture and poor air circulation around the plants. To prevent disease, water should be at the base of the plants rather than overhead, and ensure your garden has good drainage and airflow.
If diseases appear, remove and destroy affected plants to prevent their spread. Crop rotation is another effective method to minimize the risk of pests and diseases. Avoid planting black beans in the same spot year after year, as this can allow pathogens to build up in the soil.
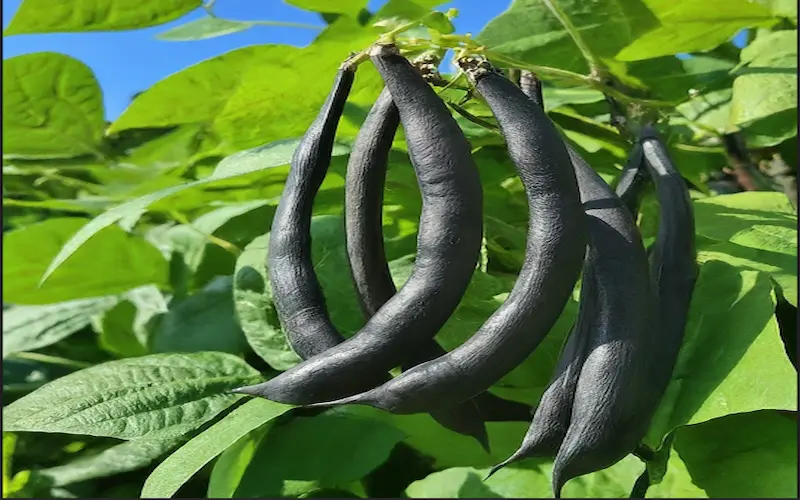
Harvesting Black beans
The timing of your harvest is critical for the quality of your black beans. Generally, black beans are ready to harvest when the pods have matured and the beans inside feel firm. The black bean pod will turn yellow and dry out, usually around 100 to 120 days after planting.
For dry beans, allow the pods to dry on the plant until they are brittle to the touch. However, if wet weather threatens the harvest, you can pull up the entire plant and hang it in a dry, airy location to finish drying.
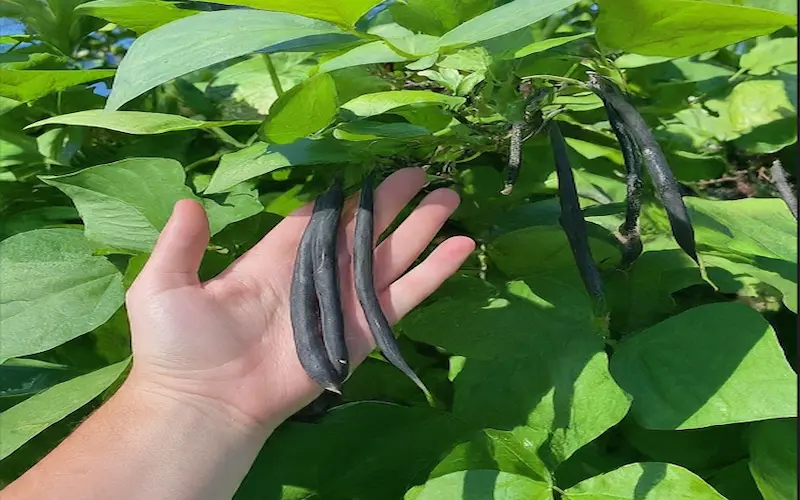
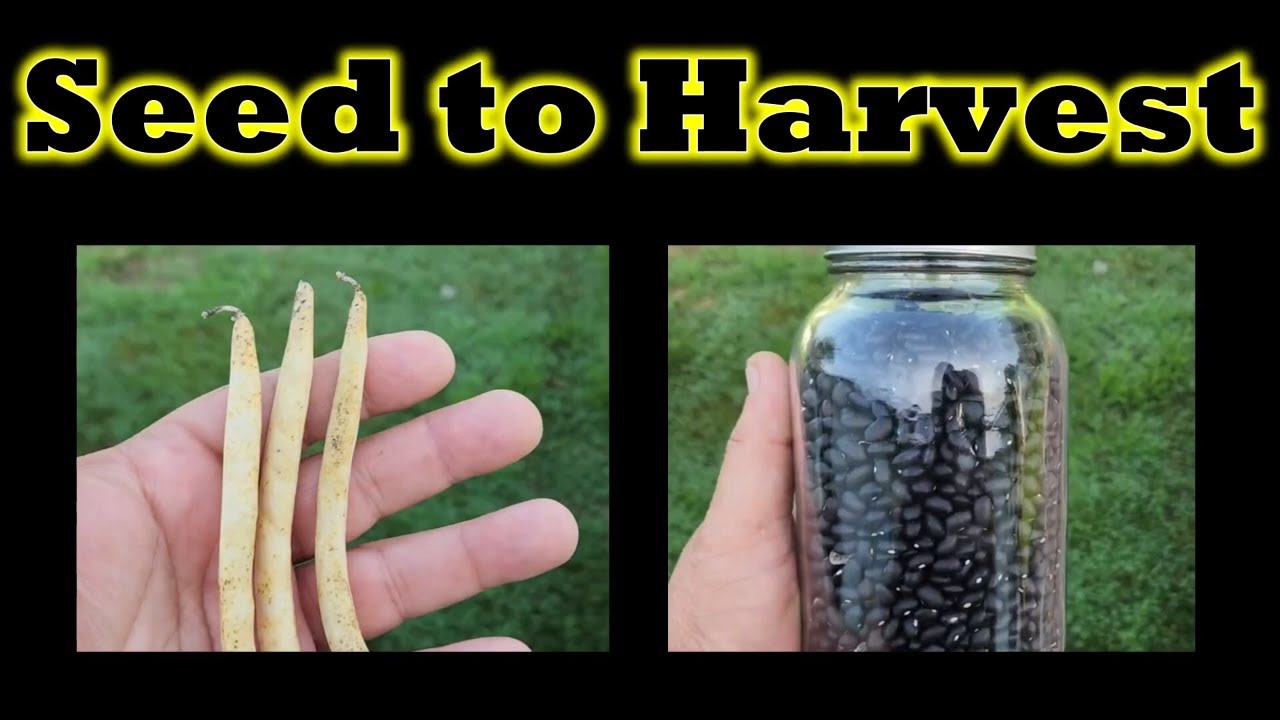
Harvesting black beans is straightforward. For fresh beans, pick the pods from the plant when they are plump but before they dry out. Please wait until the pods are dry and remove them from the plant for dry beans.
To thresh the beans, you can either open the pods by hand or place them in a bag and gently crush them to release them. After threshing, winnow the beans to remove any trash or debris. This can be done by pouring the beans from one container to another in a light breeze, carrying the lighter chaff away.
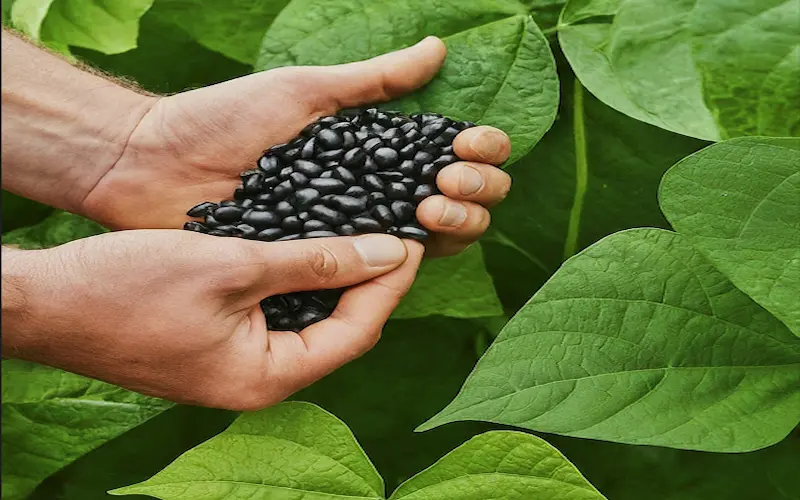
Once harvested, store your black beans in a cool, dry place. If stored properly, they can be kept for many months, providing a long-lasting supply of this nutritious and delicious legume.

Conclusion:
So, guys, in this article, we have covered how to grow black beans. If you’re new to gardening, I highly recommend starting with a small batch to get the hang of it. Choose well-draining soil, provide full sun, and be patient with growing. With proper care, you’ll enjoy a healthy harvest! If you found this guide helpful, don’t forget to share it with fellow gardeners and drop your questions in the comments below.
Frequently asked questions about How to Plant black beans.
Can I grow black beans in containers?
Yes, black beans can be successfully grown in containers. Ensure the container is large enough to accommodate the root system and has good drainage.
How to Plant Black Beans
To plant black beans, first choose a sunny spot with well-draining soil. Plant the seeds 1-2 inches deep and space 2-4 inches apart in rows. Keep the soil moist but not waterlogged. Weed and mulching regularly. Support taller varieties if needed. Harvest when pods turn black and dry.
How much water do black beans need?
Black beans need about 1 inch of water per week from rainfall or irrigation. The soil should be kept moist but not waterlogged.
What does a black bean plant look like?
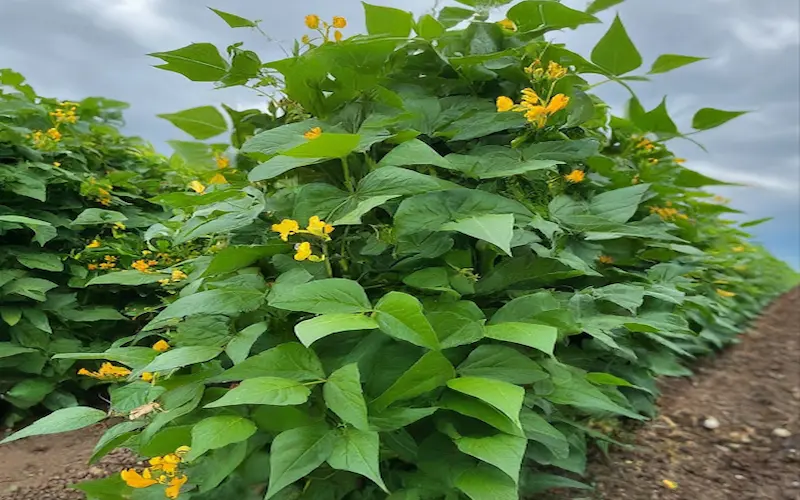
A black bean plant has green, bushy foliage with small white or purple flowers. As the plant matures, it produces long green pods that eventually turn black as they dry. The pods contain the black beans inside, which are typically harvested once they are fully mature and dried on the plant.
What’s the best way to prevent pests and diseases?
Good cultural practices, such as crop rotation, proper spacing, and avoiding overhead watering, are the best prevention. Also, keep your garden clean and remove any plant debris at the end of the season.
Depending on the variety and growing conditions, black beans mature in 90 to 140 days. They require warm temperatures and should be planted after the last frost.
A single black bean plant produces 20 to 40 pods, each containing 5 to 7 beans. This means one plant can yield 100 to 280 beans, depending on care, variety, and environmental factors.
- Seed Germination (7-10 days) – Black bean seeds sprout in warm, moist soil.
- Seedling Stage (2-3 weeks) – The first true leaves emerge, and roots develop.
- Vegetative Growth (4-6 weeks) – Plants grow taller and produce more leaves.
- Flowering Stage (6-8 weeks) – Small flowers appear, leading to bean pod formation.
- Pod Development (8-12 weeks) – The pods mature and fill with beans.
Harvesting (90-140 days) – Once pods dry out, they can be picked and shelled
Black beans are primarily grown in Central and South America, the United States, and India. In the U.S., they thrive in warm regions like North Dakota, Michigan, Nebraska, and Minnesota. They need full sun, well-drained soil, and warm temperatures to grow.


- Be Respectful
- Stay Relevant
- Stay Positive
- True Feedback
- Encourage Discussion
- Avoid Spamming
- No Fake News
- Don't Copy-Paste
- No Personal Attacks
- Be Respectful
- Stay Relevant
- Stay Positive
- True Feedback
- Encourage Discussion
- Avoid Spamming
- No Fake News
- Don't Copy-Paste
- No Personal Attacks
