Growing Moringa from Seed Made Simple for Home Gardeners
Published: 5 Apr 2025
Did you know that moringa, also called the “miracle tree,” can grow over 10 feet tall in just one season from a single seed? Moringa is packed with nutrients like iron, calcium, and protein. Moringa is one of the easiest and most rewarding plants to grow at home. If you’re curious about growing moringa from seed, this guide will walk you through every step—from choosing the right seeds to watching them sprout into healthy, leafy trees.
Understanding the Moringa Tree
Basic Facts About the Moringa Plant
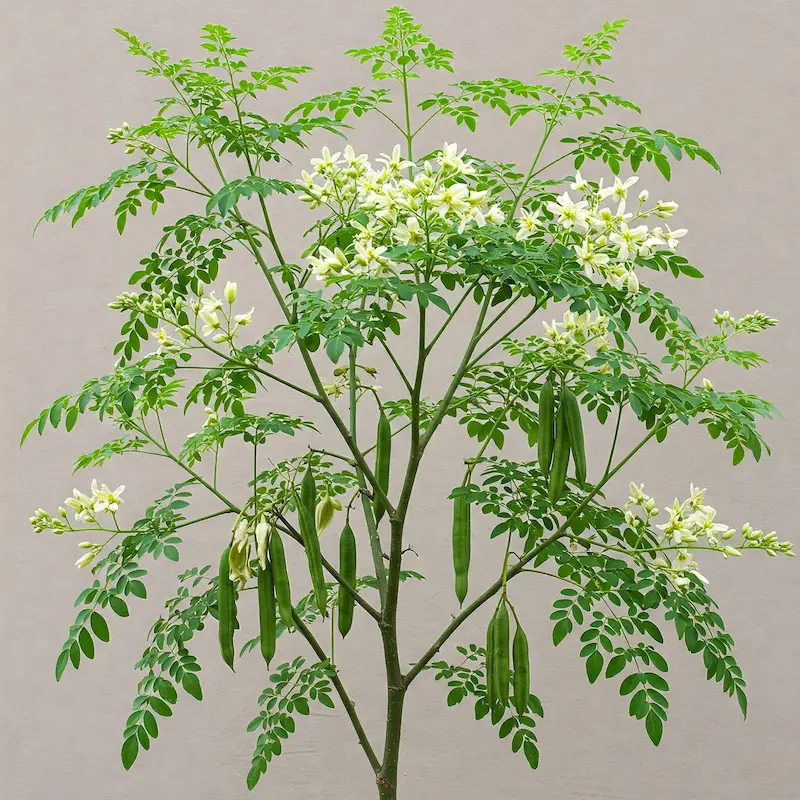
Moringa, often called the “drumstick tree” or “miracle tree,” is a fast-growing, drought-resistant plant native to South Asia and Africa. The most commonly grown species is Moringa oleifera. It’s known for its nutrient-packed leaves, long edible pods, and valuable seeds. Every part of the plant—leaves, seeds, pods, and even roots—has some use, especially in nutrition and natural medicine. Moringa is an easy-to-grow tree, but if you’re looking for another fragrant and beautiful addition to your garden, consider adding lavender plants. Both moringa and lavender thrive in sunny spots, making them perfect companions for any garden space.
Moringa trees can grow up to 10-15 feet tall in their first year under the right conditions. They thrive in hot, sunny climates and need well-drained soil to prevent root rot. Once established, moringa trees are low-maintenance, making them perfect for backyard gardens.
Benefits of Growing Moringa in Your Backyard
Here’s why so many home gardeners love growing moringa from seed:
- Nutrient-rich leaves: Moringa leaves contain vitamin A, vitamin C, calcium, potassium, and protein—great for boosting your diet.
- Fast growth: From seed to tree in just a few months.
- Low maintenance: It needs very little watering once established.
- Multipurpose plant: You can use it for food, tea, compost, or even animal feed.
- Year-round harvest: In warm climates, moringa leaves can be harvested throughout the year.
Real-life example: Many small-scale farmers in tropical regions grow moringa as a backyard crop to supplement family nutrition and sell leaves locally.
Types of Moringa (Focus on Common Variety)
There are 13 known species of moringa, but when it comes to seed growing, the most popular and widely available is:
Moringa oleifera
- Best suited for home gardens
- Easy to grow from seed
- Produces edible leaves, pods (drumsticks), and seeds
- Commonly found in seed packets online or at nurseries
Other lesser-known varieties, like Moringa stenopetala or Moringa peregrina are more region-specific and harder to manage for beginners.
Preparing for Planting
Before you start growing moringa from seed, preparing with the right seeds, good timing, and a basic understanding of your local climate are important. A little planning goes a long way when it comes to growing strong and healthy moringa trees.
Choosing the Right Seeds
Where to Buy Quality Moringa Seeds
Getting good seeds is the first step toward a successful moringa garden. You can buy moringa seeds from:
- Local garden centers or nurseries
- Online seed stores (Amazon, Etsy, or seed-specialty websites)
- Organic farmers’ markets
Look for “Moringa oleifera” on the label, as it’s the most common and beginner-friendly variety. Always choose seeds from trusted sellers who mention germination rates or provide reviews from other gardeners.
✅ How to Select Healthy Seeds for Better Germination
When picking moringa seeds, keep these tips in mind:
- Look for light brown seeds with a firm shell and papery wings.
- Avoid seeds that are too dark, moldy, or shriveled.
- Choose seeds that are fresh and harvested in the last season.
💡 Pro Tip: Soaking seeds in water overnight before planting can speed up germination by softening the outer shell.
When to Plant Moringa
Best Season or Time of Year to Plant
Moringa is a warm-season plant. The best time to plant seeds is:
- Spring to early summer, after the last frost
- When the soil temperature stays above 20°C (68°F)
- In tropical and subtropical climates, you can plant almost year-round
If you’re in a cooler region, consider starting seeds indoors in pots and then transplanting them when it’s warm outside.

Climate and Weather Conditions Needed for Growth
Moringa trees love heat and sunlight. Here’s what they need to grow well:
- Full sun exposure (at least 6–8 hours daily)
- Warm temperatures between 25°C to 35°C (77°F to 95°F)
- Low humidity and well-drained soil
- Protection from strong winds, especially when young
Avoid planting moringa during cold, wet months or in areas prone to heavy flooding, as the seeds and roots can rot easily in soggy soil.
How to Grow Moringa from Seed (Step-by-Step Guide)
Growing moringa from seed is easy, even if you’re new to gardening. Just follow these steps and you’ll be well on your way to enjoying a fast-growing, nutrient-rich tree in your backyard or containers.
Step 1 – Soak the Seeds
✅ Why Soaking Helps
First, start by soaking because taking moringa seeds before planting helps soften the outer shell and wakes up the seed’s natural growth process. It speeds up germination, especially in drier climates or compact soil. This small step makes a big difference!
How Long to Soak Before Planting
- Soak seeds in room-temperature water for 8–12 hours (overnight is perfect).
- Don’t soak for more than 24 hours, as that may cause the seeds to rot.
- After soaking, gently pat them dry with a clean cloth or paper towel before planting.
Step 2 – Prepare the Soil
Soil Type: Well-draining, Loose, and Rich in Organic Matter
Moringa doesn’t like soggy roots. Use light, well-draining soil—a mix of garden soil, compost, and a little sand works great.
- The soil should feel loose and crumbly.
- Add organic compost or aged manure to enrich the soil with nutrients.
- Avoid clay-heavy soil that holds too much water.
Ideal Spot: Sunny Location with Room to Grow
Moringa loves the sun! Choose a planting spot that:
- Gets at least 6–8 hours of direct sunlight daily.
- Has enough space—moringa trees can grow tall and wide.
- It is protected from strong winds during the seedling stage.
If you’re planting in a pot, choose one that’s at least 12 inches deep so the roots can grow freely.
Step 3 – Plant the Seeds
Depth and Spacing
- Plant each seed about 1/2 to 1 inch (1.5–2.5 cm) deep in the soil.
- If planting multiple seeds, keep at least 2 feet (60 cm) of space between each seed.
- Gently cover the seed with loose soil and lightly press it down.
Planting in Pots vs. Directly in the Ground
In pots:
- Use a container with drainage holes.
- Place the pot in a sunny spot, like a balcony, patio, or near a window.
In the ground:
- Make sure the soil drains well and doesn’t pool water.
- Plant in a raised bed or mound if your yard gets waterlogged.
💡 Tip: If you’re unsure about your outdoor conditions, start the seeds in pots and transplant them once they’re 1–2 feet tall.
Step 4 – Watering and Care
How Often to Water
- Water lightly every day until you see sprouts (usually in 7–14 days).
- Once sprouted, water 2–3 times per week, depending on the weather.
- Avoid letting the soil dry out completely during germination.
Keep Soil Moist but Not Soggy
- The key is consistency—the soil should feel moist to the touch but not wet.
- Overwatering can cause root rot while underwatering can dry out the seeds before they germinate.
If you’re in a hot climate, mulch around the base of the plant to retain moisture and keep the soil cool.
Germination and Early Growth
Watching moringa seeds sprout is exciting, especially if you’re growing them for the first time. In this section, you’ll learn how long it takes for moringa seeds to germinate, what healthy seedlings look like, and when to thin or transplant young plants.

How Long Moringa Seeds Take to Sprout
Moringa seeds are fast germination, especially in warm weather. You’ll usually see sprouts in:
- 7 to 14 days in warm, moist conditions
- Slightly longer (up to 21 days) in cooler temperatures
👉 Here are some tips for faster sprouting:
- Keep the soil moist but not soggy
- Maintain a temperature of 70–90°F (21–32°C)
- Plant seeds in well-draining soil with full sunlight
Don’t worry if only some seeds sprout. Not all seeds germinate, even if they look healthy. It’s a good idea to plant 2–3 seeds in each spot and choose the strongest one later.
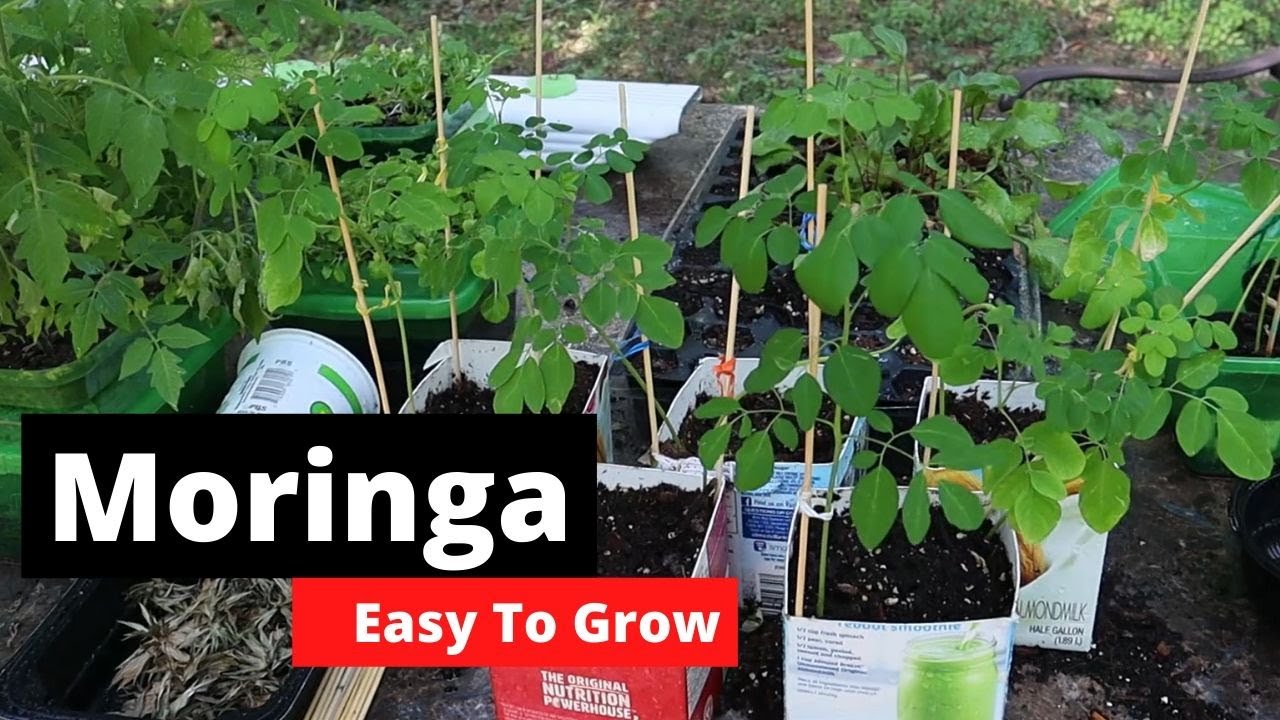
What Healthy Seedlings Look Like
Once your seeds sprout, you’ll notice small, soft green shoots breaking through the soil. These are signs of healthy seedlings:
- Bright green leaves with a slightly rounded shape
- Sturdy stems that stand upright without drooping
- Growth that’s fast and steady in sunny conditions
Healthy seedlings will start showing their first true leaves (marginally larger and more defined than the initial baby leaves) within 10–15 days of sprouting.
Watch for these issues:
- Yellowing leaves: could mean overwatering or poor soil
- Droopy stems: not enough sunlight or too much water
- Mold on soil: too much moisture and poor airflow
When to Thin or Transplant Young Plants (If Needed)
If you planted multiple seeds close together, you’ll need to thin them out.
Thinning:
- When? Thin when seedlings are about 4–6 inches tall
- How? Choose the strongest, healthiest plant and gently remove the rest
- Thinning gives each plant more space to grow roots and absorb nutrients
Tip: Don’t pull out the extra seedlings harshly. Use scissors to snip them at the base to avoid disturbing the roots of nearby plants.
Transplanting:
You can move young moringa plants from pots to the garden (or bigger containers) once they reach:
- 6–12 inches in height
- Have at least 2–3 sets of true leaves
Transplant on a cloudy day or in the late afternoon to avoid transplant shock. Water the plant well after moving it.
Make sure the new location has:
- Full sun
- Well-draining soil
- Space for roots to spread and grow
How to Grow a Moringa Tree from a Cutting
If you want a quicker way to grow moringa, using cuttings is a great alternative to growing from seed.
Why Use Cuttings?
- Grow faster growth than seeds.
- More predictable results (you know the parent plant’s quality)
- Ideal if you already have a mature moringa tree nearby
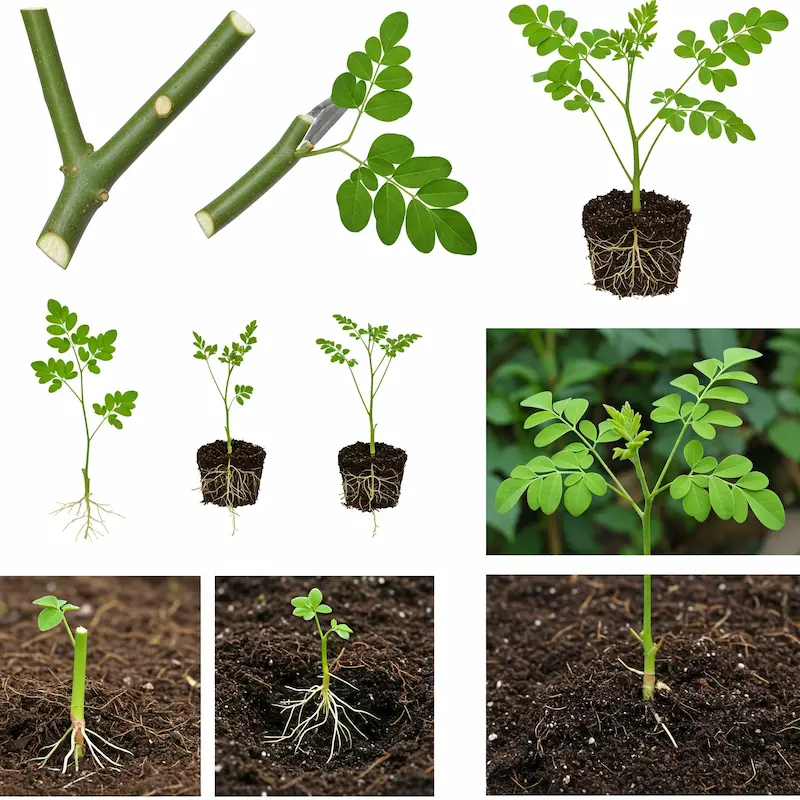
Step-by-Step Guide:
- Select a Healthy Branch:
- Choose a thick, woody branch (about 1–2 inches thick and 3–4 feet long) from a healthy moringa tree.
- Cut and Dry:
- Use clean garden shears to cut the branch. Let it dry for 1–2 days in a shaded area to prevent rotting.
- Prepare the Soil:
- Use well-draining, sandy soil. Choose a sunny location, just like for seeds.
- Plant the Cutting:
- Push one-third of the cutting into the soil. Firm the soil around it to keep it upright.
- Water Gently:
- Water lightly every few days. Keep the soil moist but not soggy.
Watch for Growth:
New leaves usually appear within 2–3 weeks. This means the cutting has taken root successfully.
Common Problems and How to Fix Them
Even though moringa is known as a hardy plant, problems can still pop up—especially in the early stages. Let’s look at the most common issues with growing moringa from seed and how to solve them the easy way.
Seeds Not Germinating (Reasons and Solutions)
If your moringa seeds aren’t sprouting, don’t worry—you’re not alone! Here are some common reasons:
1. Old or Poor-Quality Seeds
- Problem: Seeds lose their ability to germinate over time.
- Fix: Always buy fresh seeds from a reliable source. Check the packaging date.
2. Cold Soil
- Problem: Moringa needs warmth to sprout.
- Fix: Plant when the temperature is consistently 70–90°F (21–32°C). Use a seedling heat mat if needed.
3. Overwatering or Waterlogged Soil
- Problem: Too much water can rot the seeds.
- Fix: Use well-draining soil and only keep it moist—not soggy.
4. Planting Too Deep
- Problem: Seeds buried too deep may not reach the surface.
- Fix: Plant seeds about ½ inch (1.25 cm) deep for best results.
Overwatering or Underwatering Signs
Watering is important, but too much or too little can cause issues.
Overwatering:
- Yellow leaves
- Mushy or soft stems
- Mold on top of the soil
Fix: Let the soil dry slightly between waterings. Use pots with drainage holes.
Underwatering:
- Dry, brittle leaves
- Slow or no growth
- Soil pulling away from pot edges
Fix: Water thoroughly when the top 1 inch of soil feels dry. Keep soil consistently moist, especially during germination.
Pests to Watch Out For
While moringa is generally pest-resistant, young sprouts are still vulnerable. Watch for:
1. Aphids
- Tiny insects on new leaves
- Leaves may curl or become sticky
Fix: Spray with a mixture of water and mild soap or neem oil.
2. Cutworms
- These pests chew through young stems at the soil level.
Fix: Use a collar made of cardboard around the base of seedlings to block them.
3. Ants and Fungal Gnats
- Often appear if the soil is too wet.
Fix: Reduce watering and improve airflow around the plant.
Tips to Strengthen Weak Seedlings
If your moringa seedlings are looking weak, leggy, or pale, try these easy fixes:
- Sunlight: Move them to a sunny spot. Moringa loves full sun!
- Soil: Use nutrient-rich, loose soil with compost or aged manure.
- Spacing: Thin out crowded seedlings so each plant has room to grow.
- Support: Use small sticks to support floppy seedlings until stems strengthen gently.
💪 Pro Tip: A light dose of organic liquid fertilizer (like diluted fish emulsion or compost tea) once a week can help weak seedlings bounce back.
Caring for Moringa as It Grows
Once your moringa seedlings are established, the real fun begins—watching them grow into strong, leafy trees! But to help them thrive, you need to follow a few simple care steps. Let’s break it down.
Watering Schedule for Growing Plants
Moringa is drought-tolerant once established, but young plants still need consistent watering to grow well.
For young plants:
- Water 2–3 times a week.
- Make sure the soil stays moist but not soggy.
- If the top 1–2 inches of soil feels dry, it’s time to water.
For established trees:
- Water once a week, depending on the weather.
- In very hot or dry climates, increase to twice a week.
💡 Tip: Always check soil moisture before watering. Overwatering can lead to root rot.
When and How to Prune for Better Growth
Pruning moringa is key if you want a bushy plant with lots of leaves.
Why prune?
- Encourages side shoots (more leaves to harvest!)
- Prevents the plant from getting too tall and lanky
How to prune:
- Start when the plant is about 2 feet (60 cm) tall.
- Cut the top 4–6 inches off the main stem.
- After new branches grow, prune the tips again to encourage even more side growth.
Tip: Always use clean, sharp scissors or garden shears.
Fertilizing Tips (Natural and Organic Options)
Moringa grows fast even in poor soil, but a little organic boost goes a long way—especially if you’re growing in containers.
Natural options:
- Compost – mix it into the soil or apply it around the base
- Worm castings – improve soil structure and nutrients
- Banana peels – buried near the roots, add potassium and phosphorus
Organic fertilizers:
- Fish emulsion – liquid fertilizer rich in nitrogen
- Compost tea – gives a quick nutrient boost
- Seaweed extract – helps with strong root and leaf growth
Tip: Fertilize every 2–4 weeks during active growing months (spring and summer).
When You Can Start Harvesting Leaves or Pods
You don’t have to wait too long to enjoy the benefits of moringa.
Leaves:
- Start harvesting 2–3 months after planting once the tree is about 3–4 feet tall.
- Pick the older leaves first, letting new ones keep growing.
- You can harvest leaves weekly for soups, teas, or drying.
Pods (Drumsticks):
- Moringa trees start producing pods 6–8 months after planting (in ideal conditions).
- Harvest pods when they are young and tender (12–18 inches long) for the best taste.
Pro Tip: Frequent harvesting of leaves actually encourages the tree to grow more!
Growing Moringa in Containers: How to Grow Moringa in Pots or Grow Bags
Moringa, often referred to as the “drumstick tree” or “miracle tree,” is famous for its nutritious leaves, pods, and flowers. Growing moringa in containers is a great option for those with limited space or for people living in apartments. Whether you’re growing it in pots or grow bags, moringa can thrive in containers if given the right care. Here’s a detailed guide on how to grow moringa in containers, including container size, drainage, support, and best practices for small-space gardening.
Choosing the Right Container Size
Moringa trees are fast-growing, and to accommodate their rapid growth, you need to select a large enough container. The container size plays a critical role in ensuring healthy growth. Here’s what you need to consider:
- Small Trees: If you plan to grow a smaller, bushy variety or are just starting, a container with a minimum size of 15–20 gallons (around 60–75 liters) should suffice.
- Larger Trees: For a full-sized moringa tree, choose a container that is at least 20–30 gallons (75–115 liters) or more. This allows enough room for the roots to grow and spread out, which is vital for the tree’s stability and health.
- Width vs. Depth: Moringa has a taproot, so it needs deep containers to allow the root to grow properly. Ideally, the container should be at least 18–24 inches deep. A wider container will give the roots more space to grow horizontally.
Drainage is Key
Proper drainage is one of the most important aspects of growing moringa in containers. These trees do not tolerate waterlogged soil and can quickly develop root rot if the soil stays too wet.
- Drainage Holes: Ensure that the pot or grow bag has several drainage holes. If you’re using a plastic or ceramic pot, you can add extra holes in the bottom if needed.
- Well-Draining Soil: Use a well-draining potting mix that promotes good water flow. You can mix regular potting soil with perlite or coarse sand to improve drainage. The soil should be light and airy, similar to the soil in which moringa naturally grows.
- Watering Technique: Water the tree deeply but allow the soil to dry out between waterings. It’s better to underwater moringa than to overwater. Stick your finger into the soil to check for moisture—if it feels dry, it’s time to water.
Providing Support
Moringa trees can grow very tall, and their branches can become heavy as they mature. If you’re increasing moringa in a container, providing some support will help the tree stay stable and upright.
- Staking: Use a tall stake or bamboo pole to support the central stem, especially if you’re growing a taller variety. Insert the stake into the soil when the plant is still young to avoid damaging the roots later. Tie the main stem to the stake with soft twine or plant ties.
- Pruning: Regular pruning can help control the height of the tree and encourage a bushier growth habit. Moringa grows quickly, so pruning it to maintain a manageable size is crucial in container gardening. Pruning also improves airflow and sunlight exposure to the lower branches, promoting healthier growth.
Best Practices for Small-Space Gardening
Moringa trees are well-suited for container gardening, and there are several best practices you can follow to maximize success in small spaces.
a. Location and Sunlight
- Full Sun Exposure: Moringa needs plenty of sunlight to thrive, ideally 6-8 hours of direct sunlight daily. Choose a sunny spot for your container, such as a balcony, terrace, or patio. If you’re growing indoors, place it by a south-facing window where it will receive ample light.
- Temperature Considerations: Moringa grows best in warm climates and cannot tolerate frost. If you live in a colder region, you can bring the container indoors during the winter or move it to a warm, sheltered location.
b. Soil Fertility and Feeding
- Nutrient-rich soil: Moringa is not very demanding in terms of soil fertility, but it does benefit from a soil mix that contains organic matter like compost. This will provide essential nutrients for healthy growth.
- Fertilization: During the growing season, fertilize moringa every 4-6 weeks with a balanced liquid fertilizer. Moringa also responds well to organic fertilizers such as compost tea or fish emulsion.
- Low Maintenance: Moringa is drought-tolerant and doesn’t require frequent fertilization. In fact, over-fertilizing can lead to excessive foliage growth without enough fruit or pod production.
c. Space Management
- Container Placement: If you have limited space, consider using grow bags. These are lightweight, portable, and come in various sizes, making them a perfect choice for apartment balconies or small patios.
- Vertical Gardening: Consider using vertical gardening techniques to maximize space. You can install shelves or use tall planters to grow moringa vertically, allowing you to grow more plants in a smaller footprint.
- Companion Planting: If you’re growing moringa in a small garden or container setup, consider companion planting with herbs or vegetables that have similar watering and sunlight needs, such as basil or tomatoes.
Seasonal Care and Maintenance
- Winter Care: Moringa is sensitive to cold, so during the winter months, especially in regions where temperatures dip below freezing, move your container to a protected location or indoors. If it’s not possible to bring it inside, you can cover it with frost cloths to protect it from the cold.
- Temperature Range: Moringa thrives in temperatures between 77°F and 95°F (25°C to 35°C). If you live in a region with extreme heat, be sure to provide extra water, but always ensure good drainage.
- Pruning for Shape and Health: As moringa grows, it can become leggy. Pruning it to maintain a bushy form will help it grow more leaves and improve overall health. Regular pruning also helps prevent diseases by improving air circulation around the plant.
Conclusion
So guys, in this article, we’ve covered growing moringa from seed in detail. If you’re new to growing moringa, I highly recommend starting with seeds, as it’s an easy and cost-effective way to develop this amazing plant. Make sure you follow the tips for soil, temperature, and care to ensure healthy growth. Don’t forget to share your moringa growing journey with us and let us know how it goes.
Faqs about Growing Moringa from Seed
Moringa seeds take 1 to 2 weeks to germinate, depending on the growing conditions. Once germinated, the tree can start to grow rapidly. It generally takes around 6 to 8 months for the tree to grow to a height where it starts producing leaves. However, it may take up to 2 years for the tree to reach full maturity and begin flowering or making seeds.
The fastest way to germinate moringa seeds is to use the soak method. Here’s a step-by-step guide:
- Soak the seeds: Place the seeds in warm water and soak them for 24 hours before planting. This helps soften the hard seed coat, making it easier for the seed to sprout.
- Plant the seeds: After soaking, plant the seeds in well-drained soil. The seeds should be planted about 1 inch deep in the soil.
- Provide warmth: Moringa seeds germinate best in temperatures around 70-85°F (21-29°C), so make sure to plant them in a warm location.
Using this method, you should see germination within 1 to 2 weeks.
While moringa seeds are beneficial, there are a few drawbacks to consider:
- Toxicity in large quantities: Moringa seeds contain certain compounds that can cause digestive issues or be toxic if consumed in very large amounts. This makes it important to consume them in moderation.
- Hard to germinate without proper care: Moringa seeds have a hard seed coat, which can slow down germination if not treated properly (e.g., soaking). Without correct care, germination might be delayed or unsuccessful.
- Invasive nature: Moringa trees can be invasive in certain climates and may spread rapidly, potentially disrupting local ecosystems.
The best place to plant a moringa tree is in a sunny location with well-drained soil. Moringa thrives in hot, dry climates, so aim for: Moringa trees thrive in sunny locations with well-drained soil, similar to lemon trees.
- Full sun: Moringa trees need 6 to 8 hours of direct sunlight each day to grow well.
- Well-drained soil: The tree prefers light, sandy, or loamy soil that drains quickly to prevent root rot.
- Warm climate: Moringa grows best in tropical or subtropical regions, where temperatures stay above 50°F (10°C).
In regions with colder climates, it’s advisable to plant moringa in containers so it can be moved indoors during the winter


- Be Respectful
- Stay Relevant
- Stay Positive
- True Feedback
- Encourage Discussion
- Avoid Spamming
- No Fake News
- Don't Copy-Paste
- No Personal Attacks
- Be Respectful
- Stay Relevant
- Stay Positive
- True Feedback
- Encourage Discussion
- Avoid Spamming
- No Fake News
- Don't Copy-Paste
- No Personal Attacks
