The Ultimate Guide on How to Grow Malabar Spinach
Published: 16 Aug 2024
As a gardening enthusiast, you will find unparalleled joy in cultivating your vegetables. In this comprehensive guide, I’ll share my experience growing Malabar spinach from seeds. This lush, leafy green is nutritious and a beautiful addition to any garden. Let’s delve into the steps that will ensure a bountiful harvest.
Introduction to Malabar Spinach
Scientifically named Malabar spinach is Basella alba, a vigorous climbing vine that thrives in warm temperatures. Unlike traditional spinach, it is not a true spinach, but its leaves have a similar flavour and are used in much the same way. Originating from tropical Asia, it’s an excellent choice for gardeners who face hot, humid summers where other spinach varieties might wilt and bolt.
The plant boasts glossy, heart-shaped leaves rich in vitamins A and C, iron, calcium, and other essential nutrients. Due to its attractive red stems and deep green foliage, it grows well in containers and can serve as a food source and an ornamental plant. Understanding how to cultivate Malabar spinach successfully begins with an appreciation for its growth habits and optimal environment.

Malabar Spinach Varieties
Malabar spinach has two common varieties: green (Basella alba) and red (Basella rubra). Both are edible.
Green Malabar Spinach
It is also known as Malabar Spinach or Goosefoot. This leafy green vegetable is native to the Indian subcontinent. It is a popular ingredient in Indian and Southeast Asian cuisine and is known for its unique, slightly bitter flavour.
The leaves are high in iron, calcium, and vitamins A and C, making them a nutritious addition to any diet. Green Malabar Spinach can be eaten raw or cooked and is often used in salads, stir-fries, and curries.
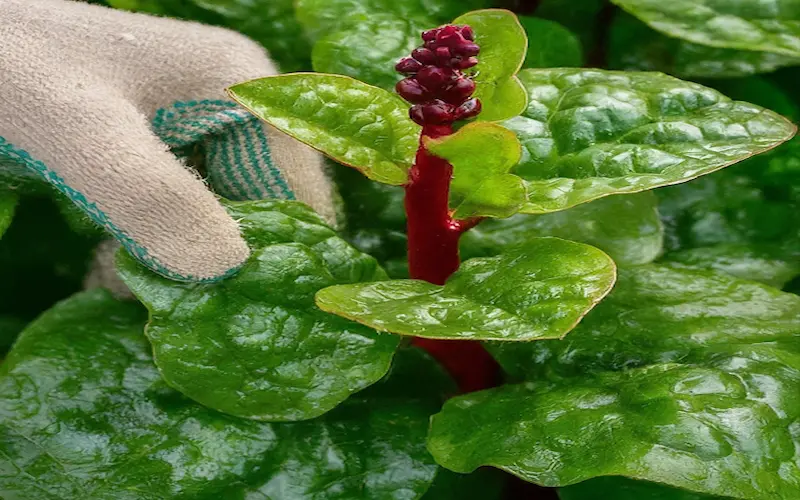
Red Malabar Spinach
Red Malabar Spinach, also known as Amaranthus spinach or Chinese spinach, is a leafy green vegetable native to Southeast Asia. Its deep red colour is mainly used in Indian and Chinese cuisine. Red Malabar Spinach is high in iron, calcium, and vitamins A and C.
It can be boiled, steamed, or sautéed and is used in soups, stews, and stir-fries. It is also used in medicine as an anti-inflammatory and detoxification agent.
Understanding the Conditions: How to Grow Malabar Spinach from Seed
Malabar spinach is a heat-loving plant which requires specific conditions to flourish.
Temperature
It prospers in temperatures ranging from 70 to 90 degrees Fahrenheit, making it ideal for growing in regions with warm summers. The plant prefers a full-sun location but can tolerate partial shade, especially in areas with intense afternoon sun.
Soil
Soil-wise, Malabar spinach is adaptable but performs best in rich, well-draining soil with a pH between 6.5 and 6.8. Ample moisture is necessary, though the roots should not sit in waterlogged conditions. As a climbing vine, it also requires vertical space to expand, which means a trellis or other support structure is essential.
You can create an environment where Malabar spinach thrives by providing these conditions. Now, let’s get into how to grow Malabar spinach from seeds.

Step 1: Selecting and Preparing Malabar Spinach Seeds
Selecting quality seeds is the first crucial step toward a successful Malabar spinach crop. Look for seeds from reputable sources, ensuring they are fresh and have a high germination rate. Once you have your seeds, it’s time to prepare them for planting.
Some gardeners recommend soaking the seeds in Water for 24 hours before planting to soften the seed coat and encourage germination. After soaking, drain the seeds and place them on a damp paper towel. This pre-germination technique allows you to identify viable seeds that swell or sprout within a few days.
If you prefer to plant directly without pre-germination, that’s perfectly acceptable, too. The seeds are robust and can germinate in the soil, though it may take a little longer.
Step 2: Soil Preparation
The soil where you plant Malabar spinach should be rich in organic matter for the best results. You can achieve this by incorporating compost or well-rotted manure into the planting area. This step not only adds nutrients but also improves soil structure and drainage.
If planting in containers, select a high-quality potting mix designed for vegetables. Ensure the containers have adequate drainage holes to prevent water accumulation. Raised beds are also an excellent option as they offer good drainage and can be filled with a custom soil blend.
Once your soil is prepared, it’s time to move on to the actual planting.
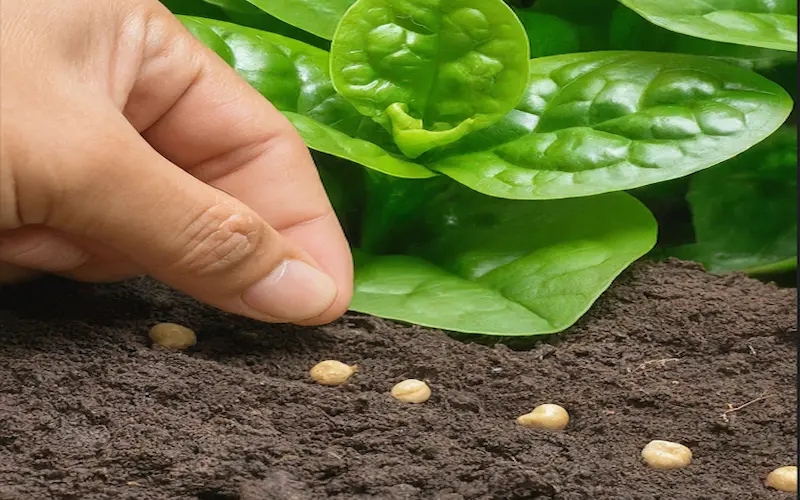
Step 3: Planting Malabar Spinach Seeds
Planting Malabar spinach seeds is straightforward. Space the seeds about half an inch deep and 12 inches apart to give each plant room to grow. If you’re using rows, keep them about 2 to 3 feet apart. Cover the seeds lightly with soil and gently pat down to ensure good contact.
In warmer climates, you can sow the seeds directly outdoors once the threat of frost has passed. For more excellent areas, start the seeds indoors about 6 to 8 weeks before the last expected frost. Use seedling trays or small pots and moisten the soil until germination, typically within 10 to 20 days.
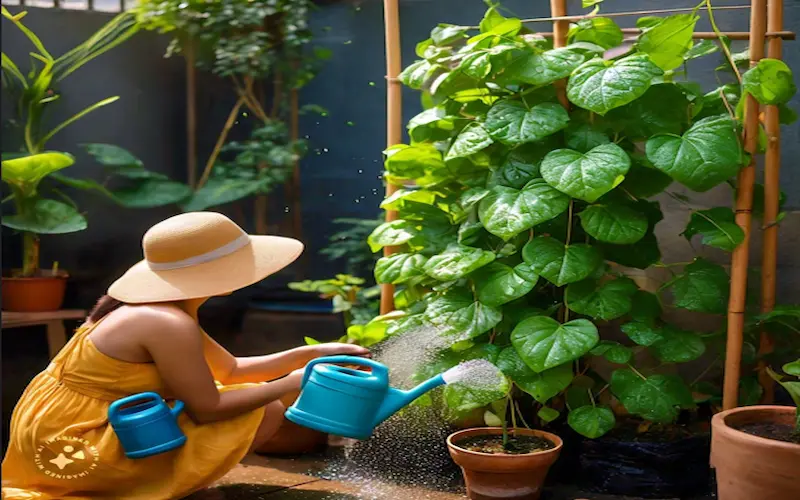
Step 4: Watering and Caring for the Seedlings
Watering
Once the seeds have sprouted, consistent watering is vital to healthy growth. Malabar spinach seedlings prefer evenly moist soil, so water them regularly, especially during dry spells. Avoid overwatering, which can lead to root rot and other issues.
Caring
As the seedlings grow, thin them out to prevent crowding and to allow for adequate air circulation. Keep the area around the plants free of weeds, which compete for Water and nutrients. A layer of mulch can help retain soil moisture and suppress weed growth.
Step 5: Transplanting the Seedlings (if required)
If you started your Malabar spinach indoors or need to space out your seedlings, transplanting might be necessary. The best time to transplant is when seedlings have at least two sets of true leaves and are sturdy enough to handle the move.
Before transplanting, harden off the seedlings by gradually exposing them to outdoor conditions over a week. This process reduces transplant shock and acclimates the plants to the elements. When ready, transplant them to their final growing location, taking care not to disturb the root system.
Step 6: Providing Support for the Vines
Malabar spinach plant vines need support to grow vertically. Installing a trellis, fence, or other structure before the Malabar plants get too large will prevent damage later. The support should be sturdy and tall enough to accommodate the vines’ full growth potential, which can reach several feet in length.
Train the vines onto the support by gently twining them around the structure as they grow. This keeps your garden tidy, promotes air circulation, and exposes more of the plant to sunlight, enhancing growth and fruiting.
Step 7: Fertilizer
Fertilizing is essential to provide Malabar spinach with the nutrients it needs to produce lush foliage. A balanced, all-purpose vegetable fertilizer applied every 4 to 6 weeks can promote vigorous growth. Alternatively, you can use a slow-release granular fertilizer at the beginning of the growing season.
Avoid over-fertilizing, as this can lead to excessive foliage with poor flavour and texture. Testing your soil’s specific nutrient needs is also a good idea. A soil test can guide your fertilizing regimen for optimal plant health.
Step 8: Managing Pests and Plant Diseases
Like all plants, Malabar spinach can be susceptible to pests and diseases. Common pests include aphids, slugs, and snails, which can be managed through manual removal, barriers, or organic pesticides. Diseases such as downy mildew and leaf spot can be minimized by proper plant spacing and avoiding overhead watering.
Inspect your plants regularly for signs of trouble and take action promptly to mitigate issues. Healthy, well-cared-for plants are less likely to succumb to pests and diseases, so maintaining good cultural practices is the best defence.
Step 9: Harvesting
Harvesting Malabar spinach is rewarding and encourages further growth. You can begin harvesting when the leaves are large enough to eat, typically around 55 to 70 days after planting. Pick leaves individually or cut entire stems if you need more at once.
Regular harvesting keeps the plant productive and can extend the growing season. Always use clean, sharp scissors or pruners to avoid damaging the plant. The more you pick, the more it will produce, so don’t be shy about harvesting.
Successful Tips
To maximize your success with Malabar spinach, keep the following tips in mind:
- ·Start seeds indoors to get a head start in cooler climates.
- · Water in the morning to reduce evaporation and prevent disease.
- ·Use organic mulches to conserve moisture and add nutrients to the soil.
- ·Monitor for pests and diseases regularly and respond quickly to any signs of infestation or illness.
- ·Harvest often to encourage new growth and extend the harvest season.
By following these tips and the steps outlined in this guide, you’ll be well on your way to a bountiful harvest of Malabar spinach.
Conclusion
Growing Malabar spinach from seeds can be a gratifying experience. This guide has walked you through each step, from selecting and preparing the seeds to harvesting your lush, leafy greens. Malabar spinach provides a continuous harvest throughout the summer and adds a tropical flair to your garden. With patience, care, and some garden know-how, you’ll enjoy the fruits of your labour in no time. Happy gardening!


- Be Respectful
- Stay Relevant
- Stay Positive
- True Feedback
- Encourage Discussion
- Avoid Spamming
- No Fake News
- Don't Copy-Paste
- No Personal Attacks
- Be Respectful
- Stay Relevant
- Stay Positive
- True Feedback
- Encourage Discussion
- Avoid Spamming
- No Fake News
- Don't Copy-Paste
- No Personal Attacks
