Spinach Growing Stages: The Secret to a Lush Harvest.
Published: 2 Feb 2025
Spinach is a fast-growing, nutrient-rich leafy green vegetable that home gardeners and commercial farmers alike. Growing it in a small backyard garden, a container on your balcony, or a large farm, understanding the spinach growing stages is essential for a healthy and productive crop.
Each stage in the spinach plant growth stages plays a crucial role in the plant’s development. From the moment the seeds are sown until the final harvest, spinach undergoes several changes that determine its yield and quality. Knowing these spinach cultivation stages helps gardeners provide the right care at the right time, ensuring strong growth and a bountiful harvest.
Spinach is a cool-season crop that grows quickly, usually reaching maturity within 30 to 50 days. However, factors such as spinach germination time, soil conditions, watering practices, and sunlight exposure can impact its growth. By learning about the spinach life cycle, farmers and gardeners can:
✔ Improve Germination Rates: Knowing the ideal temperature and moisture conditions helps ensure more seeds sprout successfully.
✔ Enhance Seedling Growth: Proper spinach seedling care reduces overcrowding and promotes strong root development.
✔ Maximize Leaf Production: Understanding spinach vegetative growth allows for better spacing and nutrient management.
✔ Prevent Early Bolting: Bolting occurs when spinach plants flower prematurely, making the leaves bitter. Proper spinach bolting prevention techniques can extend the harvest period.
✔ Harvest at the Right Time: Recognizing signs spinach is ready to harvest ensures the best flavour and texture.
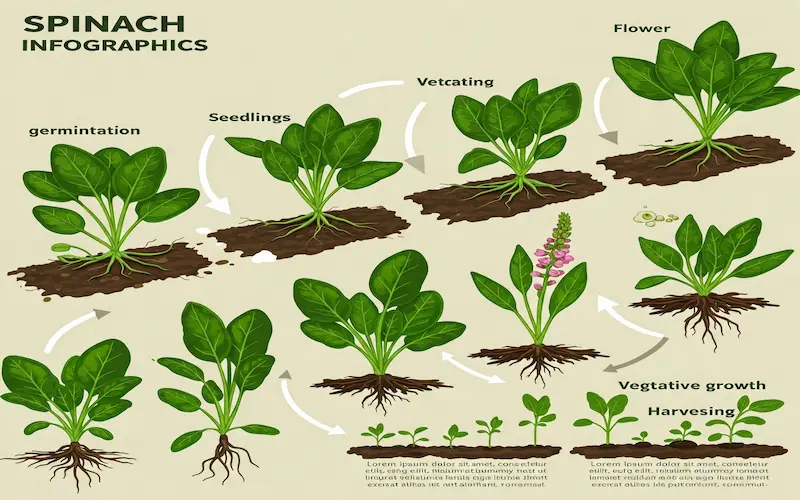
The Key Stages of Spinach Growth
Spinach growth can be divided into five main stages:
1️⃣ Germination Stage: The seed absorbs water, swells, and sprouts.
2️⃣ Seedling Stage: The first true leaves develop, and the root system strengthens.
3️⃣ Vegetative Growth Stage: The plant focuses on growing leaves, requiring ample sunlight and water.
4️⃣ Maturation Stage: The leaves reach full size, and the plant is ready for harvest.
5️⃣ Bolting Stage (if not prevented): The plant starts producing flowers and seeds, ending the leaf production phase.

Gardeners can adjust their care strategies by closely monitoring these spinach cultivation stages to ensure optimal growth. Providing the right amount of water, nutrients, and spacing at each stage significantly improves overall yield and quality.
In the next sections, we’ll dive deeper into each of these spinach plant growth stages, covering the best practices for watering spinach plants, ensuring proper spinach spacing requirements, and more. Whether you’re growing spinach in a garden bed or experimenting with growing spinach in containers, this guide will help you achieve a thriving spinach crop! 🚜🌱
Overview of Spinach Life Cycle
Spinach is a fast-growing, cool-season leafy vegetable that progresses through several distinct stages from seed to harvest. Understanding the spinach life cycle helps gardeners and farmers provide the right care at each step, ensuring a healthy and productive crop. This guide covers the full growth process and the ideal conditions required for each spinach cultivation stage, including temperature, soil, and water needs.
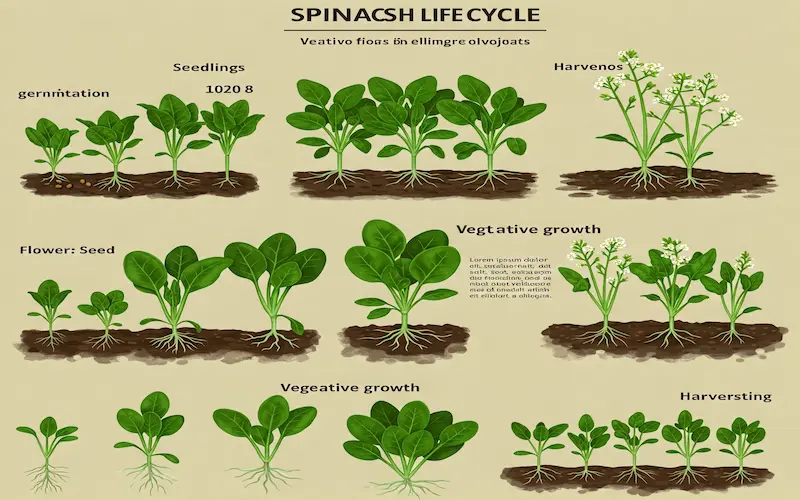
Stages of Spinach Growth from Seed to Harvest
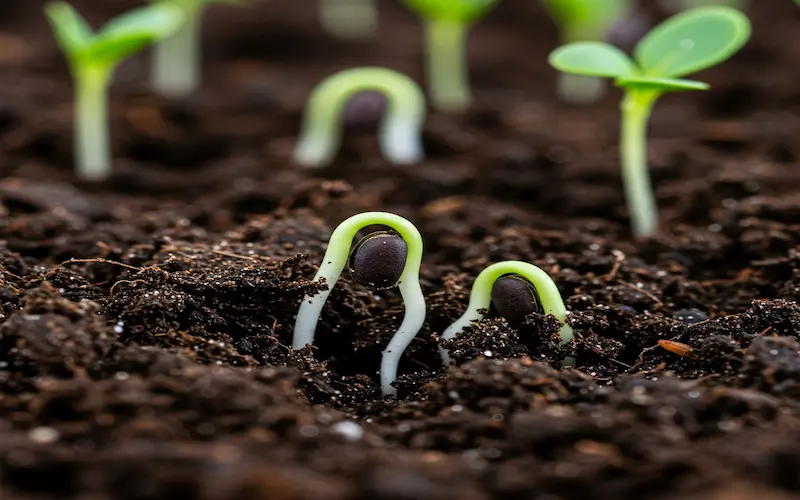
1. Seed Germination Stage
Duration: 5-10 days
Key Process: Seeds sprout and develop their first leaves (cotyledons).
Ideal Conditions for Germination:
✅ Temperature: 5°C to 24°C (Optimal: 10°C to 15°C) – Warmer temperatures may delay germination.
✅ Soil: Well-draining, loose, and rich in organic matter. The best soil pH for growing spinach is 6.0 to 7.5.
✅ Water: Keep the soil consistently moist but not waterlogged.
Growth Tip:
- Soak spinach seeds in water for a few hours before planting to speed up spinach germination time.
- Space seeds properly to avoid overcrowding later on.
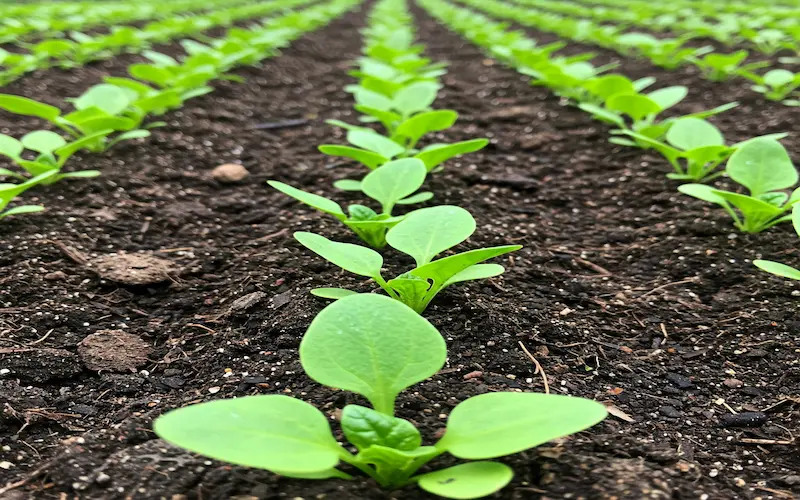
2. Seedling Stage
Duration: 1-2 weeks
Key Process: True leaves appear, and the root system develops.
Ideal Conditions for Seedling Growth:
✅ Temperature: 10°C to 20°C for steady growth.
✅ Soil: Loose, fertile, and well-aerated to support root development.
✅ Watering: Water gently to keep the soil moist, avoiding overwatering.
Growth Tip:
- Spinach seedling care includes thinning seedlings when they develop their first true leaves. How to thin spinach seedlings? Remove weaker seedlings, leaving 2-4 inches between plants for better airflow and nutrient absorption.
3. Vegetative Growth Stage
Duration: 2-4 weeks
Key Process: Leaves expand, and the plant focuses on producing foliage.
Ideal Conditions for Vegetative Growth:
✅ Temperature: 15°C to 20°C for best leaf development.
✅ Sunlight: Spinach sunlight requires at least 4-6 hours per day (partial shade is okay).
✅ Watering: Watering spinach plants 2-3 times a week, keeping the soil evenly moist.
Growth Tip:
- Apply organic fertilizer for spinach plants, like compost or aged manure, to encourage lush leaf growth.
- Use spinach companion plants like lettuce or radishes for faster growth to improve soil conditions and reduce pest problems.
4. Maturity and Harvesting Stage
Duration: 30-50 days (depending on variety and growing conditions)
Key Process: Leaves reach full size, and the plant is ready for harvesting.
Ideal Conditions for Harvesting:
✅ Temperature: Cool temperatures (10°C to 18°C) maintain leaf tenderness.
✅ Soil: Moist but well-draining to prevent root rot.
✅ Watering: Water moderately to keep leaves fresh before harvest.
Growth Tip:
- Signs spinach is ready to harvest: Leaves should be 4-6 inches long and vibrant green.
- Harvest early in the morning when leaves are crisp and hydrated.
- Spinach harvesting time depends on variety; baby spinach is ready in about 30 days, while mature leaves take around 45-50 days.
5. Bolting (Flowering) Stage
Duration: Can start after 45-60 days if not prevented.
Key Process: Spinach begins to flower, and leaf production slows down.
Ideal Conditions for Preventing Bolting:
✅ Temperature: Keep spinach cool (below 20°C) to prevent early flowering.
✅ Shade: Provide partial shade in hot weather.
✅ Watering: Maintain consistent moisture to reduce plant stress.
Growth Tip:
- Spinach bolting prevention includes planting heat-resistant varieties and harvesting leaves frequently to delay flowering.
Spinach Growth Chart
| Growth Stage | Temperature | Soil pH | Watering Frequency | Special Notes |
| Germination | 5-24°C (Ideal: 10-15°C) | 6.0-7.5 | Keep moist, not soggy | Soak seeds for faster germination |
| Seedling | 10-20°C | 6.0-7.5 | Keep moist, avoid overwatering | Thin seedlings for proper spacing |
| Vegetative Growth | 15-20°C | 6.0-7.5 | 2-3 times per week | Use organic fertilizers for leaf growth |
| Maturity & Harvest | 10-18°C | 6.0-7.5 | Moderate, keep leaves fresh | Harvest in the morning for best quality |
| Bolting | Above 20°C (Triggers bolting) | 6.0-7.5 | Maintain moisture, provide shade | Prevent bolting by harvesting frequently |
Seed Germination
The seed germination stage is the first and most critical step in the spinach growing stages. Proper germination ensures healthy seedlings, which later develop into strong spinach plants. Spinach seeds require specific conditions to sprout, including the right temperature, moisture, and soil pH.
Spinach Germination Time
How long does spinach take to grow from seed? Spinach seeds typically take 5-10 days to germinate, depending on environmental conditions. Warmer temperatures can delay sprouting, while cold temperatures below 5°C can slow the process significantly.
Factors Affecting Germination Time:
✅ Temperature: The ideal range is 10°C to 15°C.
✅ Soil Moisture: Keep soil evenly moist but not soggy.
✅ Seed Depth: Plant ½ inch deep for best results.
✅ Spacing: Space seeds 1 inch apart, as overcrowding can hinder sprouting.
Growth Tip: Soak seeds in water for 4-6 hours before planting to speed up germination. Using pre-soaked seeds can cut spinach germination time by 1-2 days.
Spinach Cotyledon Stage Care
After germination, the seedling emerges with its first set of leaves, known as cotyledons. These early leaves are essential for the plant’s initial growth and help it absorb sunlight for photosynthesis.
How to Care for Spinach Cotyledons:
✅ Keep the soil moist – Dry soil can slow down growth.
✅ Avoid waterlogging – Too much water can cause damping-off disease.
✅ Provide mild sunlight – Spinach seedlings thrive in 4-6 hours of indirect sunlight.
✅ Thin seedlings – If seedlings are too crowded, thin them to 2-4 inches apart for proper growth.
Growth Tip: A light mulch layer (like straw or compost) can help retain moisture and keep cotyledons healthy.
Ideal Soil pH for Growing Spinach
Soil pH plays a crucial role in spinach seedling care. The best soil pH for growing spinach is between 6.0 and 7.5.
Why pH Matters?
- Below 6.0 (Acidic soil): Poor nutrient absorption, leading to weak seedlings.
- Above 7.5 (Alkaline soil): Can cause iron deficiency, leading to yellow leaves.
How to Adjust Soil pH?
✅ For acidic soil (pH below 6.0) – Add lime or wood ash.
✅ For alkaline soil (pH above 7.5) – Use organic matter like peat moss or sulfur.
Growth Tip: Test soil pH using a simple soil pH meter or a DIY vinegar and baking soda test.
Hydroponic Spinach Growing Stages – Key Differences in Germination
Hydroponic systems allow spinach to grow without soil using nutrient-rich water solutions. The hydroponic spinach growing stages are slightly different from traditional soil-based methods.
Key Differences in Hydroponic Germination:
✅ Growing Medium: Instead of soil, seeds are started in rock wool, peat pellets, or coconut coir.
✅ Nutrient Solution: Seeds need a balanced hydroponic nutrient mix with nitrogen, phosphorus, and potassium.
✅ Water & Oxygen: Hydroponic setups use air pumps to provide oxygen to the roots, boosting germination rates.
✅ Germination Time: Slightly faster than soil-grown spinach, typically 4-7 days.
Seedling Development
Once spinach seeds have germinated and cotyledons appear, the plants enter the seedling development stage. This phase is crucial because it determines how well the plant will mature. Proper care ensures strong roots, healthy leaves, and resistance to pests and diseases.
Spinach True Leaf Development
After the cotyledon stage, spinach seedlings start developing their true leaves. These are the first set of leaves that resemble mature spinach foliage.
Key Features of True Leaf Development:
✅ Timeframe: True leaves typically emerge 7-14 days after germination.
✅ Shape: True leaves have a broad, slightly wrinkled structure.
✅ Growth Rate: If provided with the right conditions (moisture, light, and nutrients), spinach seedlings will quickly form new leaves.
Growth Tip: During this stage, switch from misting to light watering at the base to encourage deep root growth.
Spinach Seedling Care
Overcrowded seedlings compete for nutrients, water, and sunlight, leading to weak, stunted plants. Thinning is necessary to give each plant enough space to grow.
How to Thin Spinach Seedlings – Best Techniques to Avoid Overcrowding
🔹 When to Thin: Start thinning when seedlings reach 2 inches tall and have at least two true leaves.
🔹 Best Method: Use scissors or small pruning shears to snip extra seedlings at the soil level. This prevents root disturbance.
🔹 Spacing: Thin plants to 2-4 inches apart for healthy growth.
Growth Tip: Avoid pulling seedlings by hand, as this can damage the roots of nearby plants.
Spinach Spacing Requirements
Spacing is crucial for airflow, nutrient absorption, and preventing fungal diseases. The ideal distance depends on the spinach variety and growing method.
Recommended Spinach Spacing:
✅ For baby spinach: Space plants 2 inches apart in rows 6-8 inches apart.
✅ For mature spinach: Space plants 4-6 inches apart, with rows 12 inches apart.
✅ For container gardening: Use a 6-inch pot for each plant or plant multiple seeds in a wide container with 2-3 inches between each seedling.
Growth Tip: Use square-foot gardening by planting 9 spinach plants per square foot for an efficient, high-yield harvest.
Preventing Pests in Spinach Seedlings
Young spinach seedlings are vulnerable to pests like aphids, flea beetles, and cutworms. Taking early preventive measures can help protect the plants.
Common Spinach Pests & How to Prevent Them
| Pest | Damage | Prevention & Control |
| Aphids | Yellowing, curling leaves | Spray with neem oil or insecticidal soap. Introduce ladybugs. |
| Flea Beetles | Tiny holes in leaves | Use floating row covers or sprinkle diatomaceous earth. |
| Cutworms | Cut seedlings at the base | Place cardboard collars around seedlings. |
| Leaf Miners | White trails in leaves | Remove affected leaves and use sticky traps. |
Growth Tip: Growing spinach companion plants like onions, garlic, or marigolds can help repel pests naturally.
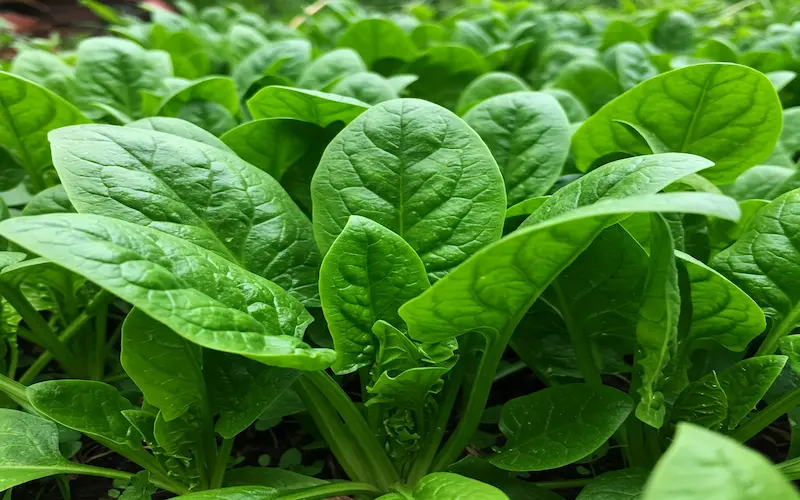
Vegetative Growth
After the seedling stage, spinach enters the vegetative growth phase, where the plant focuses on developing its leaves and roots. This is the stage when spinach produces the leafy greens that will eventually be harvested. Proper care during this phase ensures fast growth, high yield, and excellent leaf quality.
What Happens During Spinach Vegetative Growth?
During this stage, spinach plants experience:
✅ Leaf Expansion: The true leaves grow larger, becoming broad and vibrant green.
✅ Root Strengthening: The root system deepens, allowing better nutrient and water absorption.
✅ Increased Nutrient Demand: The plant requires more nutrients for plant production.
💡 Growth Tip: Regular watering, nutrient-rich soil, and proper spacing are crucial for healthy vegetative growth.
Spinach Root Depth Requirements
Spinach has a relatively shallow root system, but proper soil depth is important for strong growth.
Recommended Soil Depth for Spinach:
📌 Minimum depth: 6-8 inches (for baby spinach).
📌 Optimal depth: 12 inches (for mature spinach).
📌 For container gardening: Use pots at least 6 inches deep.
💡 Growth Tip: Loosen the soil before planting to encourage deeper root growth and better nutrient absorption.
Spinach Sunlight Needs
Spinach grows best under the right balance of sunlight and shade.
☀️ Full Sun (6+ hours/day) – Encourages fast leaf growth and prevents legginess.
🌤️ Partial Shade (3-4 hours/day) – Helps prevent bolting in warm climates.
Best Conditions Based on Climate:
✅ Cool Climates: Spinach thrives in full sun with moderate temperatures.
✅ Warm Climates: Provide partial shade to prevent early bolting.
💡 Growth Tip: If growing spinach in a hot region, use shade cloths or plant taller crops nearby to create natural shade.
Watering Spinach Plants
Consistent moisture is crucial for spinach, but overwatering can cause root rot.
How to Water Spinach Plants Properly:
💧 Watering Frequency: 1-2 inches of water per week, divided into two or three sessions.
💧 Morning Watering: Water in the morning to allow leaves to dry, preventing fungal diseases.
💧 Drip Irrigation or Soaker Hoses: These methods help maintain even soil moisture.
💡 Growth Tip: Use mulch around the plants to retain moisture and regulate soil temperature.
Spinach Companion Plants for Faster Growth
Companion planting helps improve growth, repel pests, and enhance soil nutrients.
Best Companion Plants for Spinach:
🌱 Radishes: Grow quickly and loosen the soil for spinach roots.
🌼 Marigolds: Repel aphids, beetles, and other pests.
🌿 Onions & Garlic: Naturally deter insects like leaf miners.
🥕 Carrots: Help maintain soil moisture without competing for nutrients.
Avoid Planting with:
❌ Potatoes: Can compete for nutrients and space.
❌ Fennel: Releases chemicals that inhibit spinach growth.
💡 Growth Tip: Interplant spinach with quick-growing crops to maximize garden space.
Organic Fertilizer for Spinach Plants
Spinach is a heavy feeder, requiring nutrient-rich soil to grow lush, healthy leaves. Organic fertilizers provide a slow, steady release of essential nutrients.
Best Organic Fertilizers for Spinach:
| Fertilizer Type | Key Nutrients | Application Method |
| Compost | Nitrogen, phosphorus, potassium | Mix into soil before planting. |
| Aged Manure | Nitrogen, organic matter | Apply lightly around plants every 3-4 weeks. |
| Fish Emulsion | High in nitrogen | Dilute and apply every 2 weeks. |
| Bone Meal | Phosphorus | Encourages strong root development. |
| Seaweed Extract | Micronutrients | Improves plant resilience. |
Bolting Prevention & Maturity
As spinach plants mature, they may enter the bolting stage, which signals the end of leaf production and the start of seed formation. Bolting reduces leaf quality, making the spinach bitter and tough. Preventing bolting ensures a longer harvest and better-tasting leaves.
What Is Spinach Bolting Prevention & Why Is It Important?
Bolting is when the spinach plant shifts from leaf production to flowering and seed formation. This usually happens due to:
🔺 High temperatures (above 75°F or 24°C)
🔺 Long daylight hours (more than 12-14 hours)
🔺 Plant stress (lack of water, poor soil, overcrowding)
Why Prevent Bolting?
✅ Keeps leaves tender and flavorful
✅ Extends the harvest period
✅ Ensures better yield and productivity
💡 Tip: Choosing heat-tolerant spinach varieties and providing shade can slow down bolting.
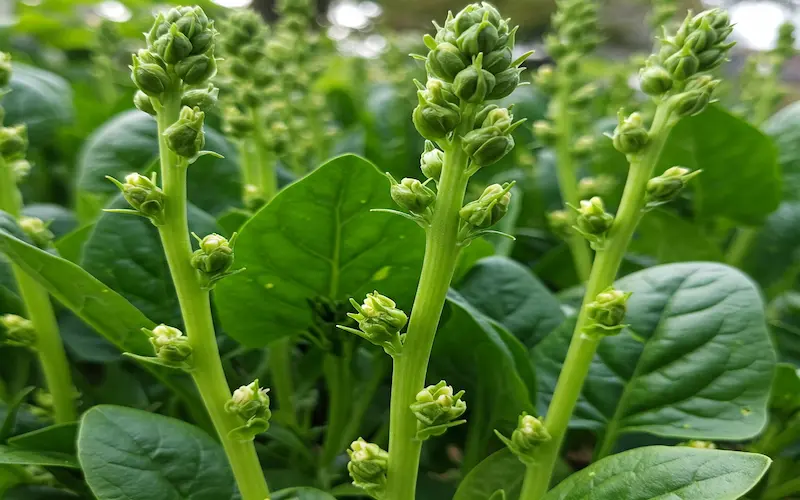
Signs of Bolting & How to Slow It Down
Signs That Spinach is Bolting
🌱 The central stem elongates and thickens.
🌼 Small flower buds start forming at the top.
🍃 Leaves become smaller, bitter, and tougher.
How to Slow Down Bolting
✔️ Grow Spinach in Cool Weather: The ideal temperature for spinach is 50-70°F (10-21°C).
✔️ Provide Partial Shade: Use shade cloths or taller companion plants in warm weather.
✔️ Mulch to Keep Soil Cool: A layer of straw or organic mulch helps regulate soil temperature.
✔️ Harvest Regularly: Pick outer leaves frequently to encourage continued leaf production.
✔️ Use Succession Planting: Sow new spinach seeds every 2-3 weeks for a continuous harvest.
✔️ Water Consistently: 1-2 inches of water daily keeps plants stress-free.
💡 Tip: If spinach has started bolting, harvest the leaves immediately before they turn bitter.
Spinach Varieties for Different Climates
Certain spinach varieties are more resistant to bolting, making them ideal for warmer climates.
Best Spinach Varieties Based on Climate
| Climate | Recommended Spinach Varieties | Key Features |
| Cool Climates (Spring/Fall) | Bloomsdale, Giant Winter, Nobel | Slow-growing, cold-hardy, sweet leaves. |
| Warm Climates (Summer) | Malabar Spinach, New Zealand Spinach | Heat-tolerant, slow to bolt, thrives in high temperatures. |
| Mild Climates (Year-round) | Tyee, Space, Red Kitten | Slow-bolting, adaptable to different seasons. |
💡 Tip: If growing in a hot area, try Malabar Spinach, which thrives in warm conditions but isn’t a true spinach.
Can Spinach Grow in Partial Shade?
Yes! Spinach can grow in partial shade, and in some cases, it’s beneficial.
Light Conditions & Their Effects on Growth
☀️ Full Sun (6+ hours/day) – Faster growth but higher risk of bolting.
🌤 Partial Shade (3-4 hours/day) – Slower growth but longer harvest period.
Best Practices for Growing Spinach in Partial Shade
🌱 Plant near taller crops (corn, beans) to create natural shade.
🌱 Use shade cloths during peak summer to reduce heat stress.
🌱 Choose shade-tolerant varieties like Tyee or Space spinach.
Harvesting & Post-Harvest Care
Harvesting spinach immediately ensures fresh, tender, and nutritious leaves. Proper post-harvest care extends shelf life and preserves flavor. Understanding when and how to harvest spinach prevents leaf bitterness and improves overall yield.
When to Harvest Spinach?
Spinach can be harvested at different stages depending on your needs:
✅ Baby Spinach (20-30 days after sowing) – Small, tender leaves perfect for salads.
✅ Mature Spinach (40-50 days after sowing) – Larger, thicker leaves with a stronger flavor.
✅ Full Maturity (50-60 days) – Ready for a final harvest before bolting.
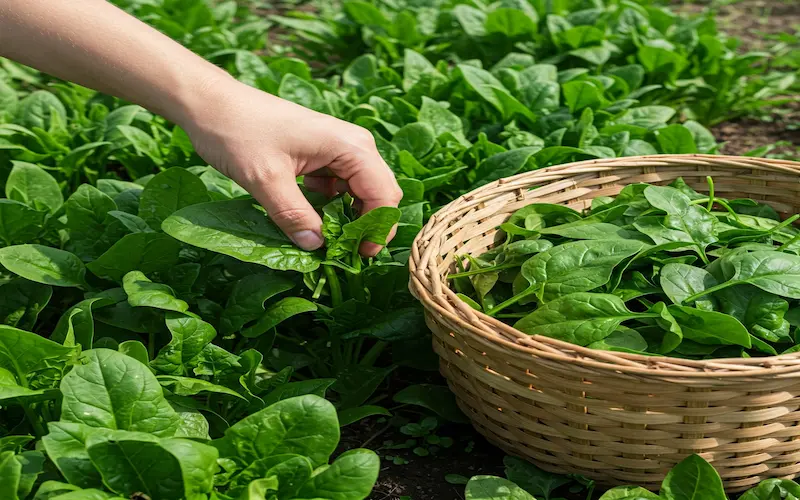
How to Harvest Spinach?
There are two main methods for harvesting spinach:
1️⃣ Cut-and-Come-Again Method:
✔️ Pick outer leaves first, allowing inner leaves to keep growing.
✔️ Use sharp scissors to cut leaves about 1 inch above the soil.
✔️ Avoid damaging the growing center to encourage more leaf production.
2️⃣ Full Plant Harvest:
✔️ Cut the whole plant at the base if it’s nearing bolting.
✔️ Leave the roots in the soil to decompose and improve soil health.
Signs Spinach Is Ready to Harvest
Check for these signs before harvesting:
🌱 Leaf Size: Baby spinach leaves should be 2-4 inches, while mature leaves should be 4-6 inches.
🌱 Leaf Color: Healthy spinach leaves are deep green and firm.
🌱 Leaf Texture: Tender leaves are smooth; overgrown leaves become tough and bitter.
🌱 Growth Habit: If the plant starts elongating (bolting), harvest immediately to avoid bitter leaves.
Growing Spinach in Containers
Growing spinach in containers is a great option for small spaces. However, proper harvesting is key to maximizing yield.
Best Practices for Harvesting Container-Grown Spinach
✔️ Harvest smaller leaves first – container spinach has limited space for regrowth.
✔️ Use shallow cuts – avoid cutting too deep to allow continued growth.
✔️ Trim regularly – frequent harvesting prevents overcrowding in pots.
✔️ Provide nutrients – container soil loses nutrients faster, so use organic liquid fertilizer every 2-3 weeks.
Spinach Growth Timeline Infographic
Here’s a simple breakdown of spinach growing stages and their harvesting timeline:
Spinach Growth Timeline
📅 Week 1-2 – Seed germination begins. 🌱
📅 Week 3-4 – First true leaves appear; seedlings need thinning. 🌿
📅 Week 5-6 – Vegetative growth phase; leaves start expanding. 🌞
📅 Week 7-8 – Baby spinach is ready for harvest. ✂️
📅 Week 9-10 – Mature spinach harvest begins. 🍃
📅 Week 10+ – Risk of bolting; harvest immediately! ⚠️
Post-Harvest Care – Keeping Spinach Fresh
Once harvested, proper storage ensures freshness and extended shelf life.
Best Ways to Store Fresh Spinach
✔️ Refrigeration (5-7 days):
- Wrap spinach in a dry paper towel and store in a breathable bag.
- Keep in the vegetable crisper drawer of the fridge.
✔️ Freezing (6-12 months):
- Blanch leaves in boiling water for 30 seconds and transfer to ice water.
- Drain well and store in an airtight freezer bag.
✔️ Drying (1 year+):
- Air-dry or use a dehydrator to preserve spinach for long-term use.
- Store in an airtight container away from moisture.
Spinach Growing Problems & Solutions
Spinach is a fast-growing, nutrient-rich, leafy green. It can face several challenges. Problems like yellowing leaves, pests, and diseases can affect Growth and yield. Identifying and solving these issues will help you grow healthy spinach plants year-round.
1. Yellowing Leaves – Causes & Solutions
Nutrient deficiencies, overwatering, or pests can cause yellowing leaves in spinach.
Causes:
🚩 Overwatering – Roots become waterlogged, leading to poor nutrient absorption.
🚩Nitrogen Deficiency – Spinach needs nitrogen for healthy green leaves.
🚩Pests (Aphids, Leaf Miners) – These insects suck plant sap, weakening the leaves.
Solutions:
✔️ Water Correctly – Water only when the soil feels dry (about 1 inch deep).
✔️Feed with Nitrogen-Rich Fertilizer – Use organic compost, fish emulsion, or blood meal.
✔️Control Pests Naturally – Spray neem oil or introduce ladybugs to eat aphids.
2. Common Spinach Pests & How to Stop Them
Spinach plants attract various pests that can damage leaves and slow Growth.
Common Pests & Their Control Methods:
🐛 Aphids – Small green insects sucking plant sap.
✔️ Solution: Spray neem oil or a mix of Water + dish soap.
🐛 Leaf Miners – Worm-like larvae creating white trails on leaves.
✔️ Solution: Remove affected leaves and use floating row covers.
🐛 Flea Beetles – Tiny black beetles that chew holes in leaves.
✔️ Solution: Dust leaves with diatomaceous earth or grow companion plants like basil.
3. Spinach Diseases & Prevention
Spinach plants are vulnerable to fungal and bacterial diseases, especially in humid conditions.
Common Diseases:
🦠 Downy Mildew – Yellow patches and fuzzy mold on leaves.
✔️ Solution: Space plants properly for good airflow and Water in the morning.
🦠 Fusarium Wilt – Leaves wilt and turn yellow due to soil-borne fungus.
✔️ Solution: Rotate crops every 2-3 years and avoid overwatering.
🦠 Cercospora Leaf Spot – Small brown spots on leaves.
✔️ Solution: Use copper fungicide and remove infected leaves immediately.
4. Winter Spinach Growing Tips – How to Grow Spinach in Colder Months
Spinach is a cold-hardy plant, making it ideal for winter gardening. However, frost and low sunlight can slow down Growth.
Best Winter Growing Practices:
❄️ Choose Cold-Tolerant Varieties
✔️ ‘Winter Giant’ and ‘Bloomsdale’ spinach varieties survive frost.
❄️ Use Mulch for Insulation
✔️ Spread straw or dry leaves around plants to protect roots.
❄️ Provide Extra Light in Low-Sun Areas
✔️ If growing indoors, use LED grow lights for at least 6 hours daily.
❄️ Cover Plants in Harsh Frosts
✔️ Use row covers or plastic tunnels to trap warmth.
5. Spinach Growth Problems & Quick Fixes
| Problem | Cause | Solution |
| Yellow Leaves | Overwatering, nitrogen deficiency | Adjust watering, use compost |
| Stunted Growth | Poor soil, overcrowding | Add fertilizer, thin seedlings |
| Holes in Leaves | Flea beetles, caterpillars | Use row covers, neem oil |
| White Patches on Leaves | Downy mildew | Improve air circulation, fungicide |
| Leaves Turning Bitter | Bolting due to heat stress | Harvest early, provide shade |
FAQs Related Spinach Growing Stages
Spinach usually takes 35-50 days to grow from seed to harvest.
🌱 Germination: 5-10 days
🌿Seedling Stage: 2-3 weeks
🌱Vegetative Growth: 3-4 weeks
✂️Harvest Time: Around 40 days
Spinach grows best in soil with a pH between 6.0 and 7.5.
✔️ Too acidic (pH below 6.0)? Add lime to raise the pH.
✔️Too alkaline (pH above 7.5)? Add sulfur to lower it.
Yes! Spinach grows well in hydroponic systems because it loves moisture and nutrients. ✔️ Use a Deep Water Culture (DWC) or Nutrient Film Technique (NFT).
✔️ Maintain water temperature 65-75°F (18-24°C).
✔️ Use a balanced hydroponic nutrient mix for leafy greens
Conclusion
Growing spinach successfully requires understanding its different growth stages and providing the right care at each step. Let’s quickly recap:
✅ Seed Germination (5-10 days): Keep the soil moist and maintain a pH of 6.0-7.5 for healthy sprouting.
✅ Seedling Development: Thin seedlings to prevent overcrowding and ensure proper spacing.
✅ Vegetative Growth: Provide enough sunlight, deep soil, and regular watering for strong leaf expansion.
✅ Bolting Prevention & Maturity: Choose the right variety and maintain cool temperatures to delay bolting.
✅ Harvesting & Post-Harvest Care: Harvest mature leaves regularly to promote continuous growth. By following these best practices, you can boost yield, improve quality, and enjoy fresh spinach at home. Whether you’re growing in soil, hydroponics, or containers, experimenting with different spinach cultivation methods will help you find what works best for your environment.


- Be Respectful
- Stay Relevant
- Stay Positive
- True Feedback
- Encourage Discussion
- Avoid Spamming
- No Fake News
- Don't Copy-Paste
- No Personal Attacks
- Be Respectful
- Stay Relevant
- Stay Positive
- True Feedback
- Encourage Discussion
- Avoid Spamming
- No Fake News
- Don't Copy-Paste
- No Personal Attacks
