6 Potato Growth Stages & Tips for a Better Harvest
Published: 15 Jan 2026
The potato plant grows through clear potato growth stages. Each stage helps the plant grow leaves, roots, and potato tubers. These stages show gardeners when to water, feed, and care for the potato plant. Good soil, sunlight, and water help people grow potatoes well. When gardeners know the potato growth stages, they prevent plant stress and low yield. This guide explains the potato growth stages in a simple and clear way.
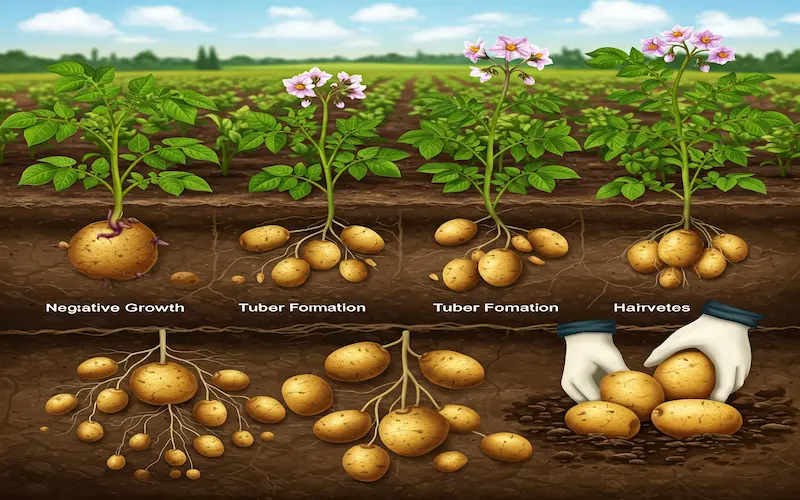
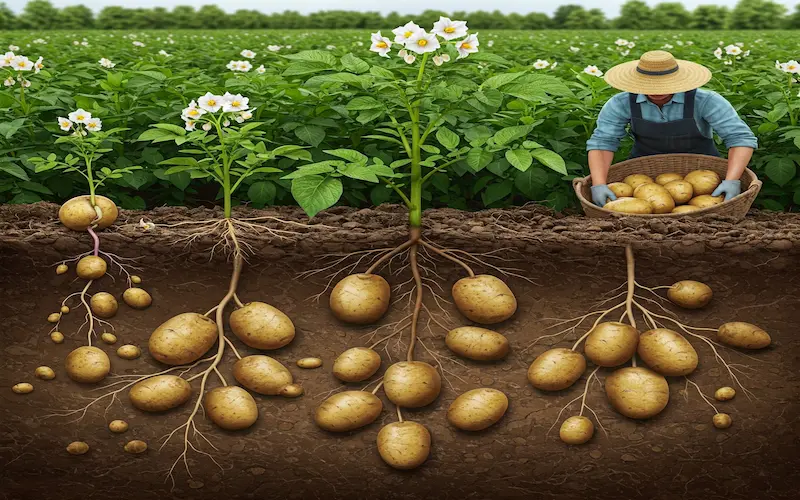
The Growth Cycle of a Potato
Potatoes grow through a natural cycle that takes time, care, and the right conditions. From planting a simple seed potato to digging up a fresh harvest, each stage plays a vital role in ensuring a good yield. Let’s break it down step by step.

Sprouting
- Potato seed develops small sprouts that will grow into new plants.
- Many gardeners use a technique called chitting—placing seed potatoes in a bright, cool space to encourage strong sprouts before planting.
Planting & Root Establishment
- Once sprouted, potatoes are planted in well-draining, nutrient-rich soil.
- The roots begin developing, anchoring the plant and preparing for strong shoot growth.
Vegetative Growth
- Shoots emerge from the soil, forming leaves and stems.
- This is the powerhouse stage—plants absorb sunlight and store energy to support tuber formation.
- Proper watering and fertilization are crucial here!
Tuber Initiation
- Some potato varieties bloom, signaling the start of underground tuber growth.
- Tiny potatoes start forming beneath the soil, drawing energy from the plant’s leaves.
- Maintaining consistent moisture is key during this stage.
Tuber Bulking (Potatoes Grow in Size!)
- The most exciting stage—potatoes begin swelling and reaching full size.
- Nutrients, water, and good soil aeration help ensure bigger, healthier tubers.
- Too much nitrogen can lead to excessive leafy growth instead of tuber development.
Maturation & Harvest Readiness
- The leaves and stems begin to yellow and die back, signaling that potatoes are nearly ready.
- Skin thickens, helping potatoes store longer after harvest.
- Proper timing ensures the best yield—harvesting too early means smaller potatoes, while waiting too long can lead to sprouting in the ground.
Why Each Stage Matters for a Good Yield
Every stage of a potato’s growth cycle impacts the final harvest. If any of one is missing from proper sprouting, balanced watering, or timely harvesting then potatoes can result in smaller or fewer. By understanding each phase, growers can provide the right care at the right time, leading to a healthy, abundant crop.
Want the best potatoes? Pay attention to their growth cycle, and they will reward you with a delicious, homegrown harvest!
Stages of Potato Plant Growth
Sprouting Stage
The first step in growing potatoes starts before they even touch the soil! Potatoes have small buds, called eyes, that eventually sprout and grow into a new plant. This stage is crucial because strong, healthy sprouts lead to better plant growth and a higher yield.
- After a period of dormancy, the potato’s eyes begin to sprout.
- These sprouts will later develop into stems and roots once planted.
- Sprouting can happen naturally, but gardeners often encourage it for better results.
One of the best ways to jumpstart the sprouting process is chitting. This means placing seed potatoes in a bright, cool place before planting to develop strong, short sprouts. Here’s how to do it:
- Choose healthy seed potatoes with visible eyes.
- Place them in an egg carton or shallow tray with the eyes facing up.
- Keep them in indirect sunlight at a temperature of around 50°F to 60°F (10°C to 15°C).
- Wait 2-4 weeks until sturdy, greenish-purple sprouts appear.
The best time to start sprouting (chitting) potatoes depends on your local growing season. Generally, you should begin 4-6 weeks before your last expected frost date. For example:
- In cooler climates, start chitting in early spring (February-March).
- In warmer areas, sprouting can begin in late winter (January-February).
This simple step can give your potatoes a head start, leading to faster growth and a better harvest!
Planting Stage
Once seed potatoes have sprouted, it’s time to plant them. Proper planting is key to ensuring healthy plant growth and a good yield. The right soil, spacing, and planting depth all play an important role in potato development.
Ideal Soil Conditions & Planting Depth
- Soil Type: Potatoes grow best in loose, well-draining soil with plenty of organic matter. Sandy or loamy soil is ideal.
- pH Level: The best soil pH for potatoes is between 5.0 and 6.5 (slightly acidic).
- Moisture: Soil should be moist but not soggy. Overwatering can cause rot.
- Planting Depth: Seed potatoes should be planted about 3 to 4 inches (7-10 cm) deep to allow proper root development.
Spacing & Seed Potato Selection
- Spacing Between Plants: Keep 12 inches (30 cm) between each potato plant to allow space for tuber formation.
- Spacing Between Rows: Maintain 24-36 inches (60-90 cm) between rows to ensure good air circulation.
- Choosing the Right Seed Potatoes: Use certified seed potatoes (not grocery store potatoes) to avoid diseases.
Cutting large seed potatoes can help you get more plants from a single potato. Here’s how to do it right:
- Choose seed potatoes that are at least golf-ball-sized or larger.
- Using a clean, sharp knife, cut them into pieces, making sure each piece has at least 1-2 healthy sprouts (eyes).
- Let the cut pieces dry in a cool, ventilated space for 24-48 hours before planting. This helps form a protective layer that prevents rotting.
- Once dried, plant them sprout-side up in well-prepared soil.
By following these planting tips, you’ll give your potatoes the best start for a strong and healthy growing season.
Germination & Early Growth
After planting potatoes, begin their early growth phase. During this stage, shoots break through the soil, and the first leaves appear. This is a crucial period because the plant starts photosynthesis, which provides the energy needed for tuber formation. Proper watering and temperature control are key to ensuring strong and healthy growth.
Shoots Emerge from the Soil
- After 1 to 2 weeks, small green shoots push through the soil.
- The speed of emergence depends on soil temperature and moisture. Warmer soil (above 50°F or 10°C) helps speed up germination.
- If shoots take longer than expected, cold soil or improper planting depth might be the cause.
First Leaves Appear & Start Photosynthesis
- As the shoots grow taller, the first leaves begin to open.
- These leaves absorb sunlight and kickstart photosynthesis, the process by which the plant creates food for growth.
- A strong start with healthy leaves ensures better tuber production later on.
Watering & Temperature Requirements
- Watering:
- Keep the soil evenly moist, but avoid overwatering.
- Water 1-2 inches (2.5-5 cm) per week, increasing as plants grow.
- Overwatering can cause root rot, while underwatering can slow down growth.
- Temperature:
- The ideal temperature for early potato growth is 60-70°F (15-21°C).
- If temperatures drop below 50°F (10°C), growth slows down. If it rises above 80°F (27°C), the plant may struggle.
- A layer of mulch can help maintain consistent soil temperature.
Tips for Strong Early Growth
✔ Hill up soil around emerging shoots to protect them from frost.
✔ Use row covers in colder climates to keep young plants warm.
✔ Keep an eye out for pests like aphids that can damage tender leaves.
By ensuring the right conditions in this early stage, you set the foundation for a strong, healthy potato plant that will produce a great harvest later.
Vegetative Growth
At this stage, potato plants focus on growing tall, strong stems and lush green leaves. The healthier the foliage, the more energy the plant produces for tuber development. Proper care, fertilization, and pest control are essential during this period.
Plants Grow Tall, Producing Strong Stems & Leaves
- About 3-4 weeks after germination, the plant enters a rapid growth phase.
- Stems become thicker, and new leaves continuously form.
- The plant grows 12-24 inches (30-60 cm) tall, depending on the variety.
- Healthy, green leaves mean the plant is absorbing enough sunlight for photosynthesis, which fuels tuber production underground.
Importance of Nitrogen-Rich Fertilizers
- Nitrogen (N) is essential for leaf and stem growth.
- Apply a balanced fertilizer with high nitrogen content (e.g., 10-5-5 NPK) during early vegetative growth.
- Avoid too much nitrogen later, as it can lead to excessive leaf growth and fewer tubers.
- Best fertilization method: Side-dress the plants with compost or a nitrogen-rich fertilizer when they reach 6-8 inches (15-20 cm) tall.
Common Issues: Pests Like Aphids & Flea Beetles
- Aphids:
- Small, soft-bodied insects that suck sap from leaves.
- Signs: Curled leaves, sticky residue (honeydew), and stunted growth.
- Control: Spray with neem oil or introduce natural predators like ladybugs.
- Flea Beetles:
- Tiny, jumping beetles that chew small holes in leaves.
- Signs: Shot-hole damage on leaves, reduced plant vigor.
- Control: Use floating row covers and apply diatomaceous earth around plants.
Tips for Healthy Vegetative Growth
✔ Water regularly to keep soil evenly moist.
✔ Hill up soil around stems to support growth and protect developing tubers.
✔ Monitor for pests early and use organic treatments to avoid infestations.
✔ Avoid over-fertilizing with nitrogen once flowering begins.
This stage lays the groundwork for tuber formation, so keeping plants strong and pest-free will lead to a bigger and healthier potato harvest.
Flowering & Tuber Formation
As the potato plant matures, it enters the flowering stage. While not all varieties produce flowers, this stage marks the beginning of tuber formation underground. Proper care at this point ensures bigger, healthier potatoes at harvest.
Flowers Appear
- Some potato plants produce small, white, pink, or purple flowers, while others do not flower at all.
- Flowering typically starts 6-8 weeks after planting.
- The presence or absence of flowers does not always indicate tuber development—potatoes can still form underground even if the plant doesn’t flower.
Underground, Tubers Begin Forming & Swelling
- Around the time of flowering, tiny baby potatoes (tubers) start forming on underground stolons (root-like stems).
- These tubers begin to swell as the plant stores energy from photosynthesis.
- Watering is crucial at this stage—keep soil evenly moist to support tuber growth.
Example: How Flowering Affects Tuber Size
- Flowering signals that the plant is using energy for tuber development.
- A well-fertilized, well-watered plant with healthy foliage produces larger tubers because it generates more energy for underground growth.
- Stress (like drought or nutrient deficiency) during flowering can lead to smaller, misshapen tubers.
Tips for Better Tuber Growth
✔ Avoid high-nitrogen fertilizers at this stage—focus on potassium-rich fertilizers (e.g., 5-10-10 NPK) to support tuber swelling.
✔ Hill up soil around the base of the plant to protect growing potatoes from sunlight, which can turn them green and toxic.
✔ Keep an eye out for pests like Colorado potato beetles, which can damage leaves and slow down tuber development.
By ensuring proper care during this phase, you help your potato plants produce a high yield of large, healthy tubers.
Maturation & Skin Hardening
As the potato plant reaches its final growth stage, it prepares for harvest. The vines begin to die back, and the tubers develop a firmer skin, making them more suitable for storage. Proper care at this stage ensures better-quality potatoes with a longer shelf life.
Vines Begin to Yellow and Die Back
- Around 12-16 weeks after planting, the green potato vines start to turn yellow and wither.
- This natural process signals that the plant has stopped producing energy and is redirecting nutrients to the tubers.
- If vines are still green and growing, the potatoes are not fully mature yet.
Tubers Develop Firm Skin
- When potatoes mature, their skin becomes thicker and tougher, preventing damage during harvest and storage.
- To test maturity, rub the skin of a potato—if it peels off easily, the tubers need more time underground.
- A firm, unbroken skin means the potato is ready for harvest and storage.
Tips: When to Stop Watering Before Harvest
✔ Stop watering 1-2 weeks before harvest to allow tubers to cure underground.
✔ Dry soil helps toughen the skin, making potatoes less prone to bruising and rot.
✔ Avoid harvesting in wet soil, as it makes potatoes more vulnerable to disease.
By allowing proper maturation, you ensure that your potatoes store well and have a great texture for cooking. A little patience at this stage leads to a better, longer-lasting harvest.
Harvesting Potatoes
Harvesting at the right time ensures the best flavor, texture, and storage quality. Understanding the signs of maturity and using the correct harvesting techniques helps prevent tuber damage.
Signs That Potatoes Are Ready to Harvest
- New (Early) Potatoes: Can be harvested 2-3 weeks after flowering, when tubers are still small and tender. The skins are thin and will rub off easily.
- Mature Potatoes: Ready when the vines have completely yellowed and died back (usually 12-16 weeks after planting).
- Skin Test: Gently rub the skin—if it peels easily, wait longer for full maturity.
Best Harvesting Methods to Avoid Damaging Tubers
- Use a Garden Fork or Spade: Carefully dig around the plant, starting 6-8 inches (15-20 cm) away from the base.
- Lift Tubers Gently: Avoid stabbing or bruising potatoes. Damaged ones won’t store well.
- Harvest on a Dry Day: Wet soil can make potatoes harder to dig and increases the risk of rot.
- Curing for Storage: Let harvested potatoes sit in a cool, dry place for 1-2 weeks to toughen the skin before long-term storage.
Example: Difference Between Early (New) Potatoes & Mature Potatoes
- New Potatoes:
- Small, thin-skinned, and best eaten fresh.
- Have a sweeter, delicate flavor.
- Not suitable for long-term storage.
- Mature Potatoes:
- Larger, with thick, firm skin for long-term storage.
- Used for baking, frying, and cooking.
- Can be stored for months in a cool, dark place.
By harvesting at the right time and handling potatoes with care, you can enjoy fresh new potatoes early and store mature ones for later use.
Storing and Using Harvested Potatoes
Once harvested, potatoes need proper curing and storage to stay fresh for months. Without the right conditions, they may shrivel, sprout, or rot. Follow these steps to keep your potatoes in the best shape for long-term use.
Proper Curing Process for Long-Term Storage
- Why Cure? Curing hardens the skin, reduces moisture loss, and heals small cuts.
- How to Cure:
- Lay potatoes in a cool, dark, and well-ventilated place for 10-14 days.
- Keep the temperature between 45-60°F (7-15°C) with high humidity (85-95%).
- Avoid direct sunlight—it can turn potatoes green and toxic.
Best Storage Conditions to Prevent Sprouting
- Temperature: Store potatoes at 38-45°F (3-7°C) for long-term storage.
- Darkness: Light exposure causes greening and sprouting. Use a dark place like a cellar, pantry, or paper bag.
- Humidity: Keep moisture moderate—too much causes rot, too little makes potatoes shrivel.
- Ventilation: Store in open containers (mesh bags or wooden crates) to prevent moisture buildup.
Example: How Temperature Affects Sprouting
- Too Warm (Above 50°F / 10°C): Potatoes sprout faster, become soft, and lose flavor.
- Too Cold (Below 38°F / 3°C): Starch turns into sugar, making potatoes too sweet and mushy when cooked.
- Ideal Range (38-45°F / 3-7°C): Prevents sprouting while keeping texture and flavor intact.
By curing and storing potatoes correctly, you can enjoy fresh, firm potatoes for months without worrying about spoilage.
Common Problems & Solutions in Potato Growth
Growing potatoes can be rewarding, but they are prone to diseases and pests. Proper care and prevention help ensure a healthy and productive crop.
Potato Diseases: Blight & Scab
- Late Blight (Phytophthora infestans):
- Symptoms: Dark, water-soaked spots on leaves, white mold underneath.
- Solution: Use disease-resistant varieties, avoid overhead watering, and rotate crops.
- Early Blight (Alternaria solani):
- Symptoms: Brown, concentric rings on leaves, leading to leaf drop.
- Solution: Remove infected leaves, apply copper-based fungicides, and maintain soil health.
- Potato Scab (Streptomyces scabies):
- Symptoms: Rough, corky patches on potato skin (affects appearance, not edibility).
- Solution: Maintain slightly acidic soil (pH 5.0-5.5) and avoid excessive nitrogen fertilizers.
Pest Management Tips
- Aphids: Tiny insects that suck sap and spread viruses.
Solution: Spray neem oil or use ladybugs as natural predators. - Colorado Potato Beetles: Yellow and black-striped beetles that chew leaves.
Solution: Handpick beetles, apply organic insecticides, or use row covers. - Wireworms: Small, yellow larvae that bore into tubers, causing damage.
Solution: Rotate crops, use potato traps (bury pieces to attract and remove them).
Example: Companion Planting to Deter Pests
- Good Companions:
- Marigolds – Repel nematodes and beetles.
- Horseradish – Deters Colorado potato beetles.
- Beans – Improve soil nitrogen, benefiting potatoes.
- Avoid Planting With:
- Tomatoes & Peppers – Susceptible to the same diseases as potatoes.
By practicing crop rotation, proper spacing, and organic pest control, you can reduce disease risks and grow a thriving potato crop.
Conclusion:
So guys, in this article, we have covered potato growth stages in detail. Growing potatoes is easy if you follow the right steps at each stage. I recommend choosing disease-resistant varieties and keeping an eye on soil health for the best results. If you’re excited to start your potato garden, why not plant a few today? Let me know in the comments how your potatoes are growing.
The potato plant goes through five key growth stages:
- Sprouting Stage – Seed potatoes develop shoots.
- Vegetative Growth – Stems and leaves grow rapidly.
- Flowering & Tuber Formation – Flowers may appear, and tubers start forming underground.
- Maturation & Skin Hardening – The plant’s foliage begins to die, and tubers develop a firm skin.
Harvesting & Storage – Potatoes are dug up, cured, and stored for future use.
The time varies by variety:
- Early potatoes take 60-90 days to mature.
- Mid-season potatoes need 90-110 days.
- Late-season potatoes require 110-135 days.
The potato growth cycle begins with sprouting and continues through:
- Planting – Seed potatoes are placed in the soil.
- Emergence & Vegetative Growth – Leaves and stems develop.
- Flowering & Tuber Formation – Underground tubers start forming.
- Maturation – Plants stop growing, and tubers harden.
- Harvesting – Potatoes are dug up when mature
Potatoes reach maturity based on variety:
- New potatoes (early harvest): Ready in 60-70 days.
- Mature potatoes: Fully develop in 90-120 days.
For best results, wait until the vines turn yellow and die back before harvesting. This ensures fully grown, long-lasting potatoes.


- Be Respectful
- Stay Relevant
- Stay Positive
- True Feedback
- Encourage Discussion
- Avoid Spamming
- No Fake News
- Don't Copy-Paste
- No Personal Attacks
- Be Respectful
- Stay Relevant
- Stay Positive
- True Feedback
- Encourage Discussion
- Avoid Spamming
- No Fake News
- Don't Copy-Paste
- No Personal Attacks
